DIY Raised Garden Bed Cover to Protect Raised Garden Beds from Animals
Want to learn how to make a raised garden bed cover with hinges to protect your precious raised garden beds from animals? This DIY garden bed cover with fence is perfect for you! It is a beginner friendly project that you can tackle over a weekend, as it doesn’t require fancy tools or skills. At the end, you’ll have a garden bed fence that perfectly sized for your raised bed.
For more DIY tips and ideas, be sure to follow me on Instagram!
Get the Build Plan
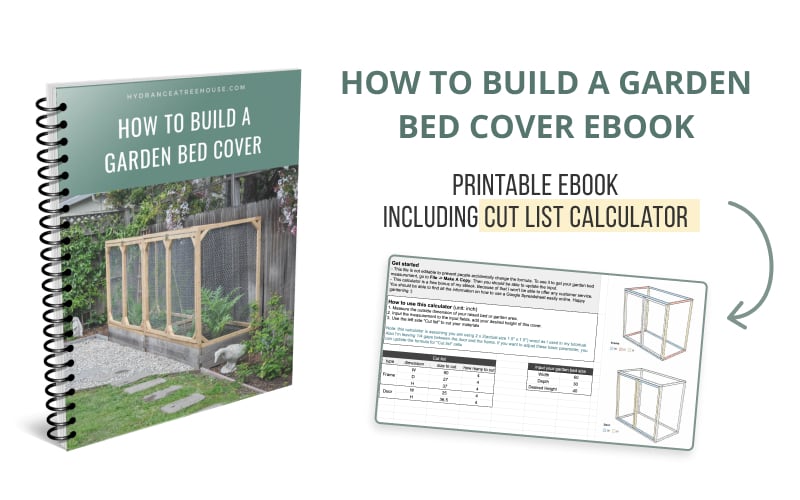
I have most of instructions that you need for this DIY project in this post. But it is a long read. If it’s more convenient, you can purchase printable plan here, including a cut list calculator here: DIY Garden Bed Cover Build Plan $4.99.
It has the full instruction with expanded details, optimized in a book format, faster to read, and free of ads. This way you can print it out and bring it with you when you are shopping for materials or building this project.
This build plan also include a do-it-for-you cut list calculator so you input your garden bed measurement and get your custom cut list. Click on the picture below to purchase.
Why do you need a garden bed cover for your raised bed?
In general, protective covers for raised garden beds are a great idea for gardeners looking for a way to protect their plants from harsh temperatures, pests, and other environmental factors. There are a variety of garden bed cover ideas to choose from, ranging from plastic covers to mesh covers, depending on the needs of the gardener.
It serves as a garden cage to keep your crops in and keep the animals out. For me, the biggest reason behind my DIY raised garden bed covers project is to protect my garden bed from animals so our plants can stay alive and thrive.
When I first started my vegetable garden on my two raised beds, I didn’t know the importance of having a protective cover for my garden beds. Soon enough, I noticed a lot of my seedlings and vegetables got chewed up down to the ground.
It took me a while to figure out it was the squirrels who ate up all of our vegetable crop.
At first, I was lazy and tried several ineffective ways to repel the squirrels, such as spraying chili water over my plants, and adding an owl statue. But none of them worked!
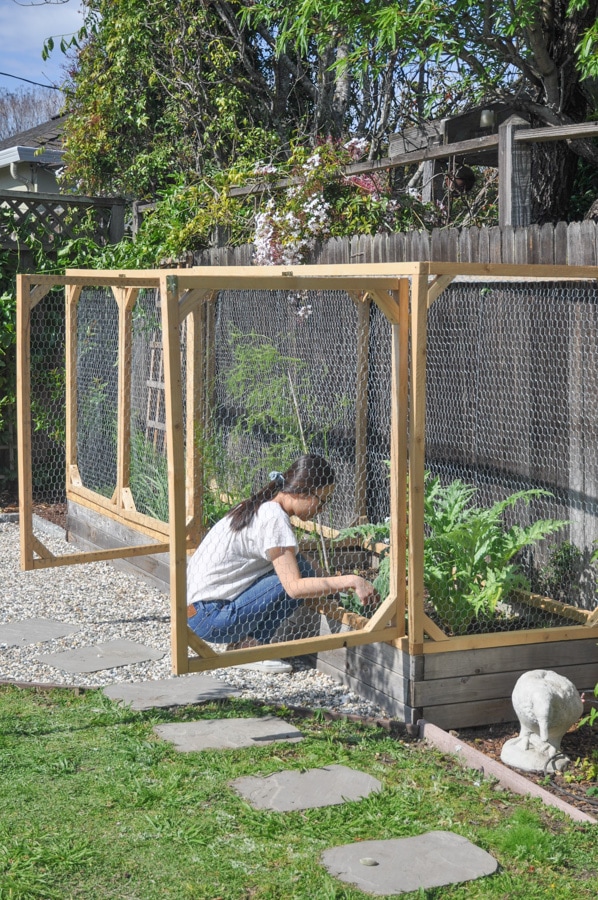
So I was determined to get a garden bed cover to win this war with squirrels for good, and I built this DIY garden bed cover with hinged doors. And since then, I haven’t had to worry about any pesky animals in my garden again. Woohoo!
My vegetables are thriving, no more loss of leaves or seedlings! Now I can grow whatever vegetables and fruits I like without worrying if squirrels like them as well.
This DIY garden bed cover will work for other animals as well, such as raccoons, deer, and others.
How to make a raised garden bed cover with hinges video tutorial
If you are a visual learner, I made a 5-minute video on our process of building this DIY garden bed cover with double hinged doors:
(If you are having trouble seeing this video, you can watch it on my Youtube.)
I recommend you watch this video to get an idea on what the whole process looks like, then continue reading for DIY materials and step by step instructions 🙂
If you want to watch more videos like this, be sure to subscribe to my Youtube Channel.
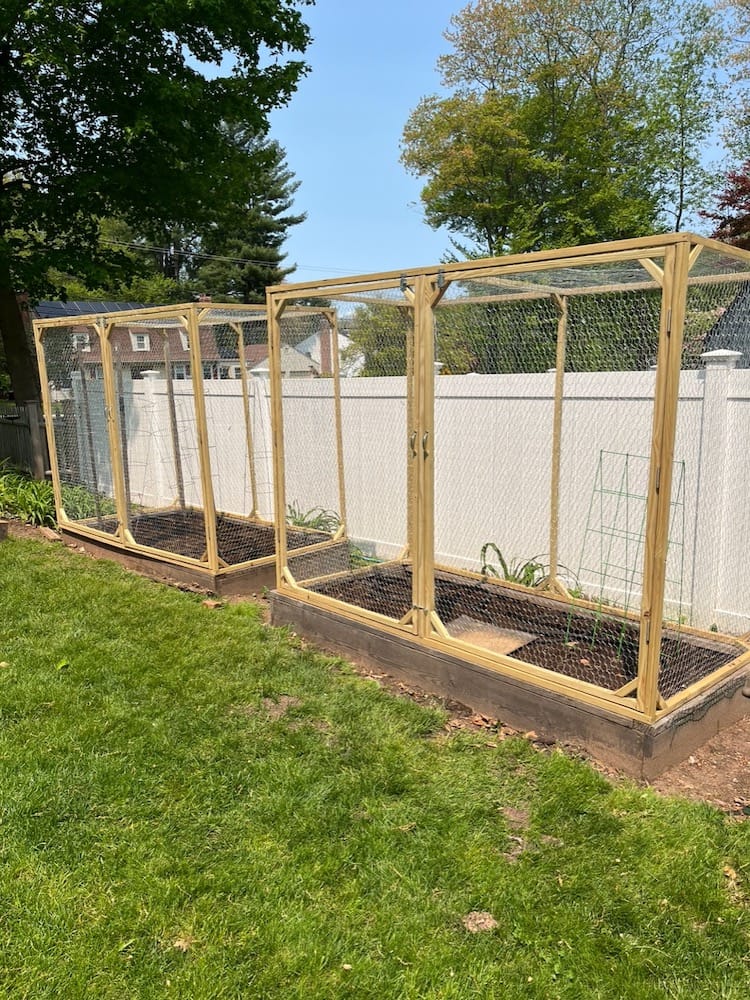
DIY raised garden bed cover finished dimensions
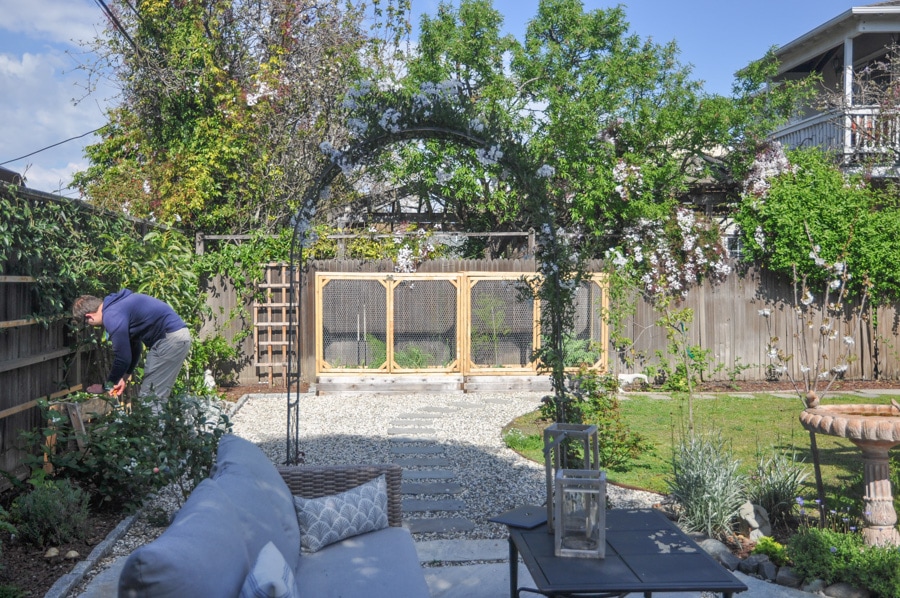
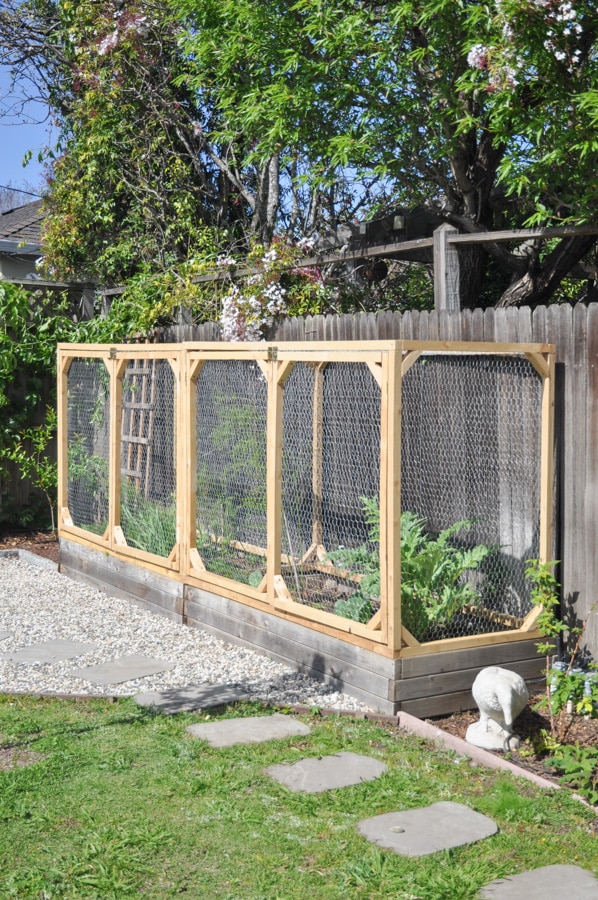
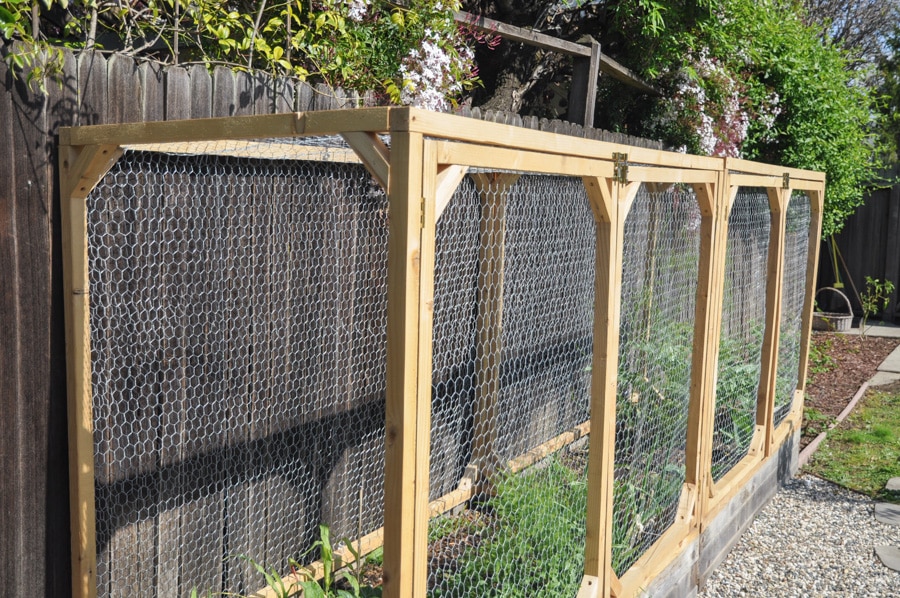
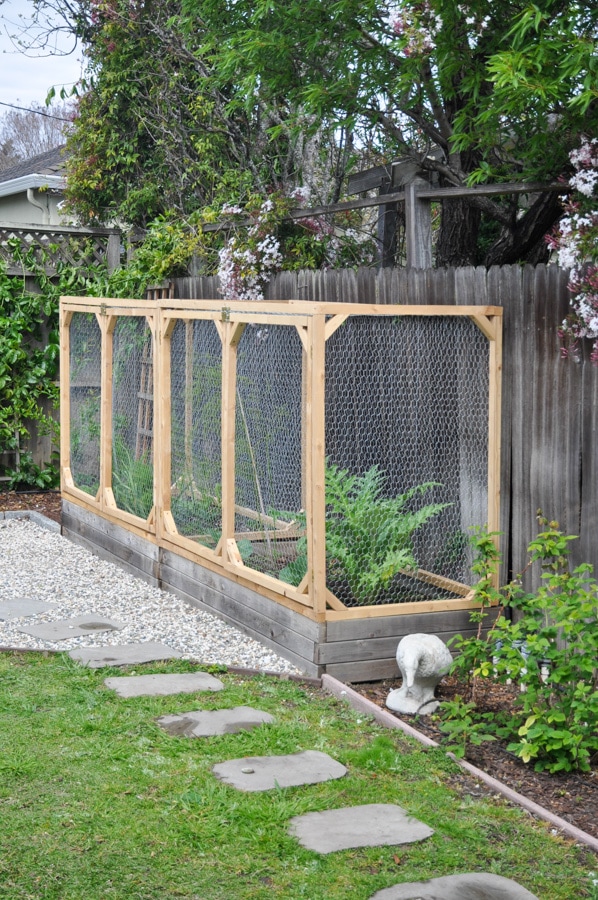
For my garden beds, I have two standard 3′ by 6′ raised beds, similar to this one. The finished DIY garden bed cover is about 6 feet wide, 4 feet tall, and slightly less than 3 feet deep.
Why did I reduce the depth of my raised garden bed cover? There are two reasons:
- I have 1/2″ irrigation tubing sitting on top of the back edge of the raised bed.
- the fence between our yard and our neighbor’s is quite old so the top portion is slightly leaning to our side.
By reducing the garden cage depth I’m able to address those two factors.
In terms of deciding this garden bed cover and doors height, I need this protective cover to be fairly tall to account for large plants and vines, such as artichokes, peas, and cucumbers. I landed on 4 feet as the garden cage height.
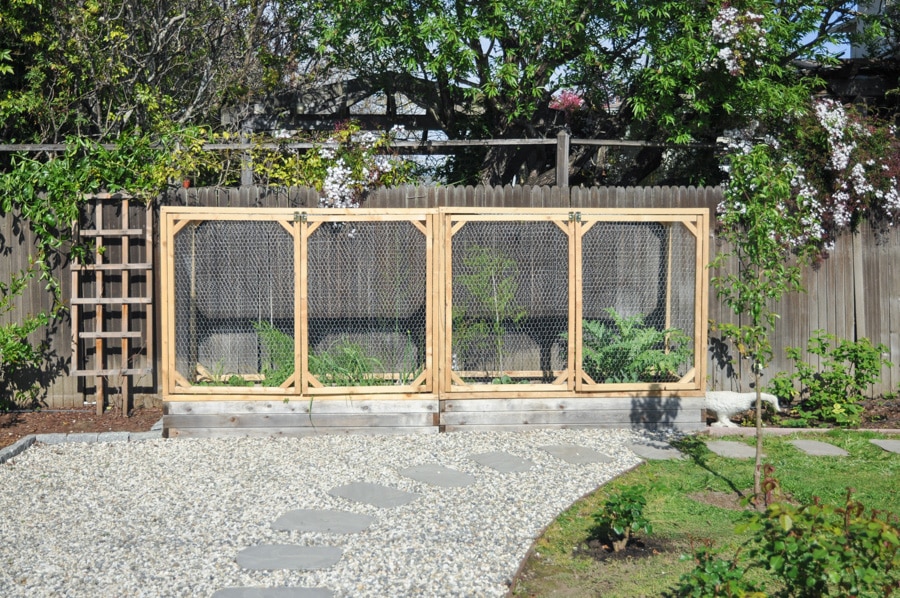
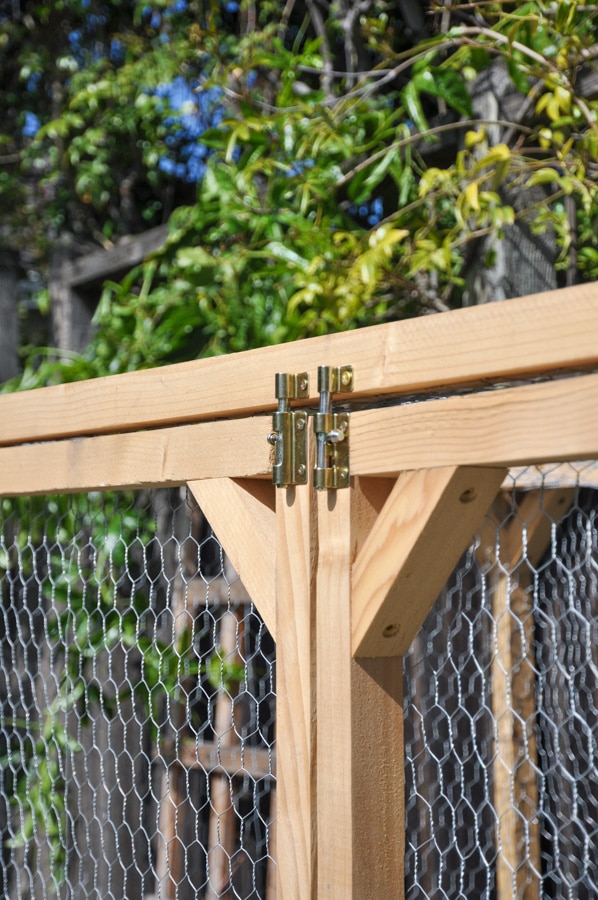
This raised garden bed covers is made from wood and installed with hinges to make them easy to open and close. So each garden bed cover has a pair of doors, attached to the frame with hinges. I also installed two barrel bolt on the top frame to make sure I can close them securely.
Also this DIY garden cover is completely covered by chicken wire for all sides except the bottom. Chicken wire is a durable weather resistant material for garden covers, and does a great job at keeping animals out from my garden bed.
Btw, this DIY garden cage can be removable if you like, or you can attach it to your raised bed securely. I’ll share more on that in details during the instructions.
DIY raised bed cover tools and materials
Here are the materials I used for this DIY garden cage. Most materials listed below are for one 3′ by 6′ raised bed cover, and you may need to adjust the size accordingly depends on how large you want your garden cage to be:
Exterior grade 2 in. x 2 in. x 8 ft wood board
Chicken wire. I use 3′ wide chicken wire because it matches well with my 3′ by 6′ raised bed. I used 30′ per garden bed cover.
Miter saw to cut the wood
1/2″ spade bit and drill
Stapler. You can choose a electric stapler to save some elbow grease
Stainless steel staples (exterior grade)
Brass hinges x 4 (exterior grade)
Brass barrel bolt x 2 (exterior grade)
DIY raised garden bed cover instructions
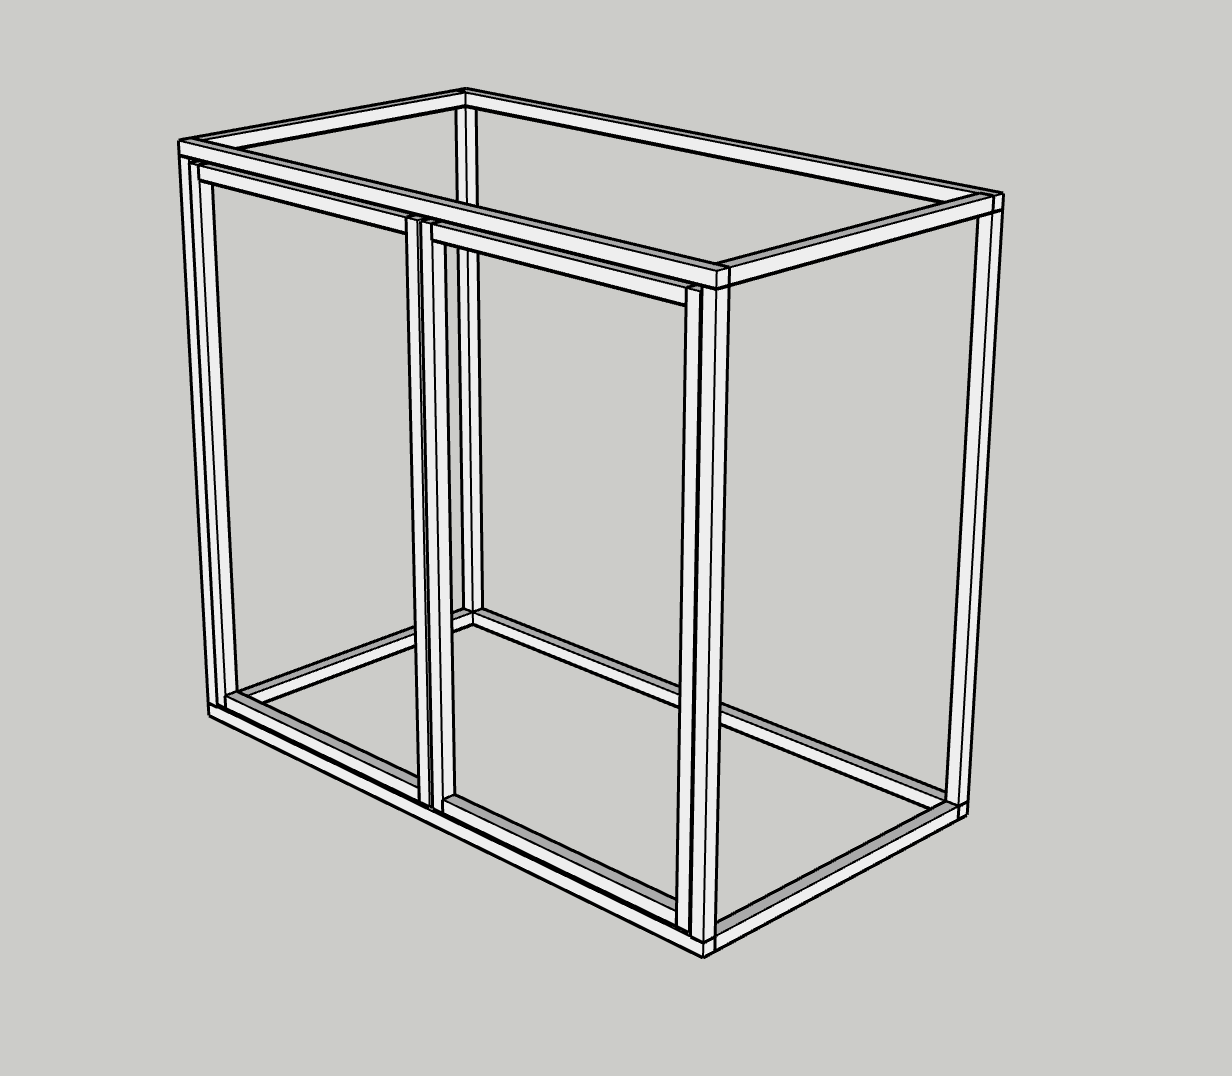
Here’s the diagram of this garden bed cover I created in SketchUp. This shows how all the pieces come together.
DIY raised bed cover project cut list
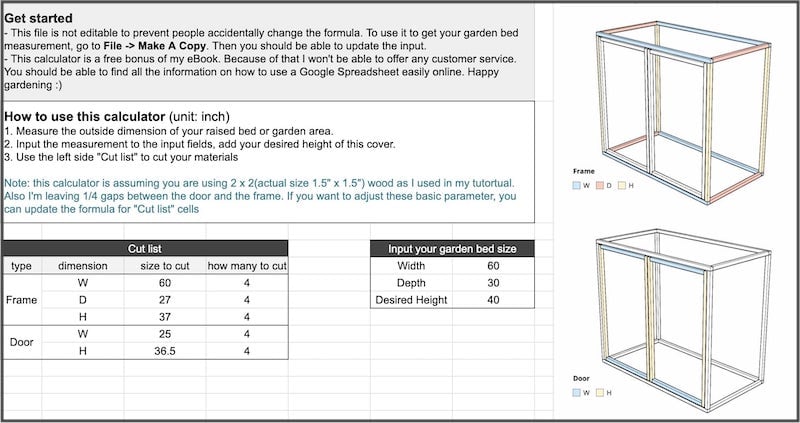
I designed this garden bed cover to fit my 3’x6′ garden bed (similar to this raised bed). If your raised bed is a different size, the board lengths you’ll need will vary. I recommend sketching out your frame on paper to figure out the cut lengths for your specific setup—just keep in mind that a 2×2 board actually measures 1.5″ x 1.5″.
Want to skip the math? You can purchase my build plan, which includes a full cut list for a 3’x6′ bed plus a handy calculator to generate a custom cut list based on your exact garden bed dimensions.
If you’ve already purchased the plan, the calculator is on page 7—just enter your bed’s width and length, and it will tell you exactly how to cut your boards.
👉 Get the build plan with the calculator here.
Step 1. Cut 2in x 2in x 8ft boards to size.
To build the frame of this DIY garden cage, you’ll need to cut those 2×2 boards into two type of pieces, one for building the garden cover frame structure, the other for diagonal braces to support the structure.
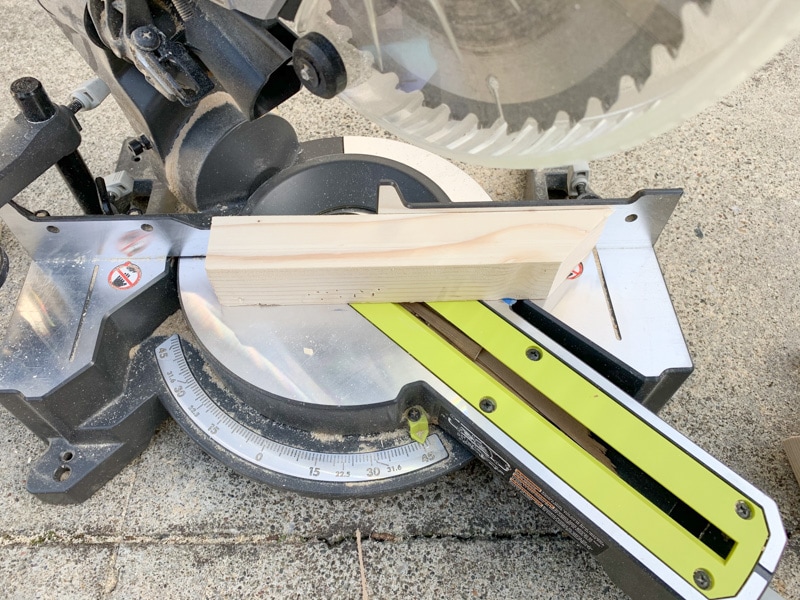
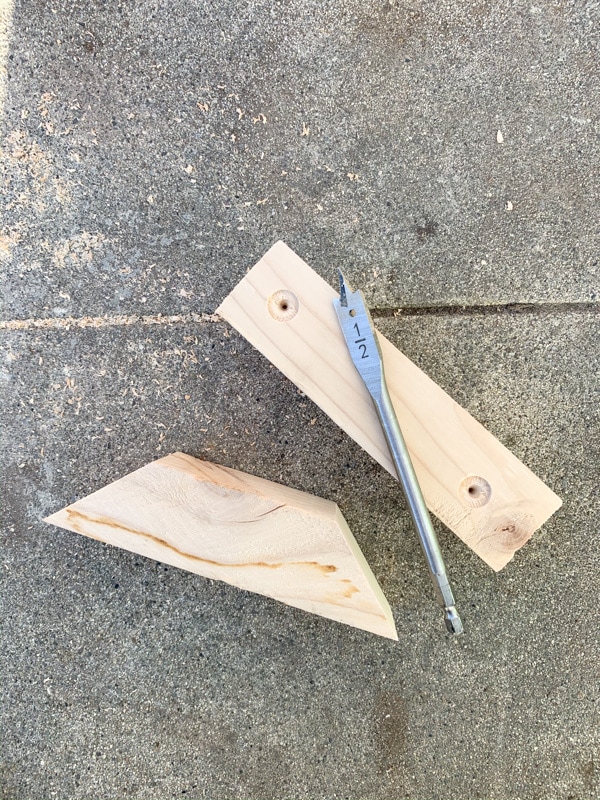
All the frame structure pieces are straight cut. All braces are 45 degree diagonal cut.
One trick to quickly produce the braces is to align the board to a point on your miter saw (you can use tape to mark it), and flip it back and forth between cutting. In my case, I used the line(right) on my miter saw to align the 2×2 boards.
If you have watched the video above, you’ll know what I’m talking about. This way you will be able to produce a lot of those pieces in a short amount of time, also they will be exactly the same size without pre-measuring.
To prepare the diagonal braces, I used 1/2″ spade bit to create a dent on each side, about 1″ from the edge. I have used spade bit quite a lot for counter sink screws.
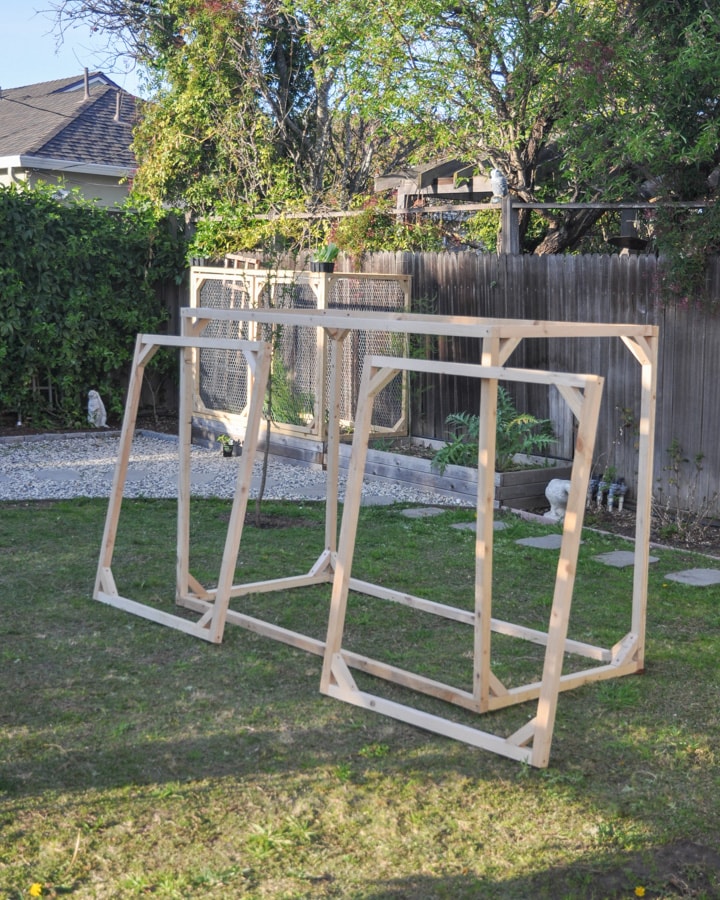
Step 2. Build garden cover frame structure.
Now moving onto assembling the garden bed cover. For each connection, we drill a pilot hole and then screw in the 2″ exterior wood screw. You’ll want to choose exterior grade screws because they won’t rust and deteriorate your raided bed protective cover.
Also, drilling pilot holes is important for this project as without them the wood will tend to split while you attach them.
If you have a pocket hole jig, use it as it will make your life a lot easier.
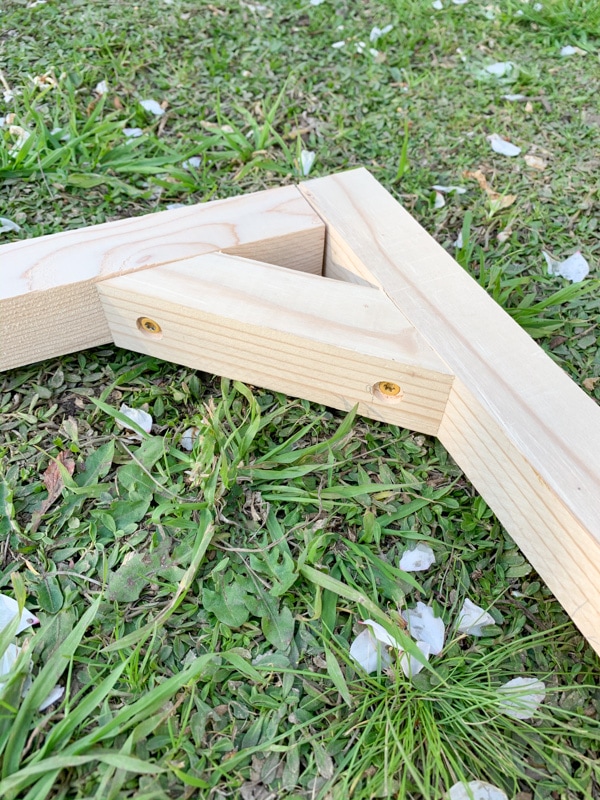
We didn’t own a pocket hole tool back then, so we used two screws per corner where three 2×2 boards meet. We drilled each hole around 1/3 of the way instead of the exact center, that will give the second screw some space to pass through.

Attach a diagonal brace to straighten and strengthen the corner. You’ll need to attach braces for most of the straight corners except:
1. the front side. You want to leave it open so you can add doors.
2. the bottom side. This is to maximize the planting area of you garden bed without blocking the soil. Also the bottom side of the garden cover is just sitting on top of the raised bed, not really holding any weight by itself.
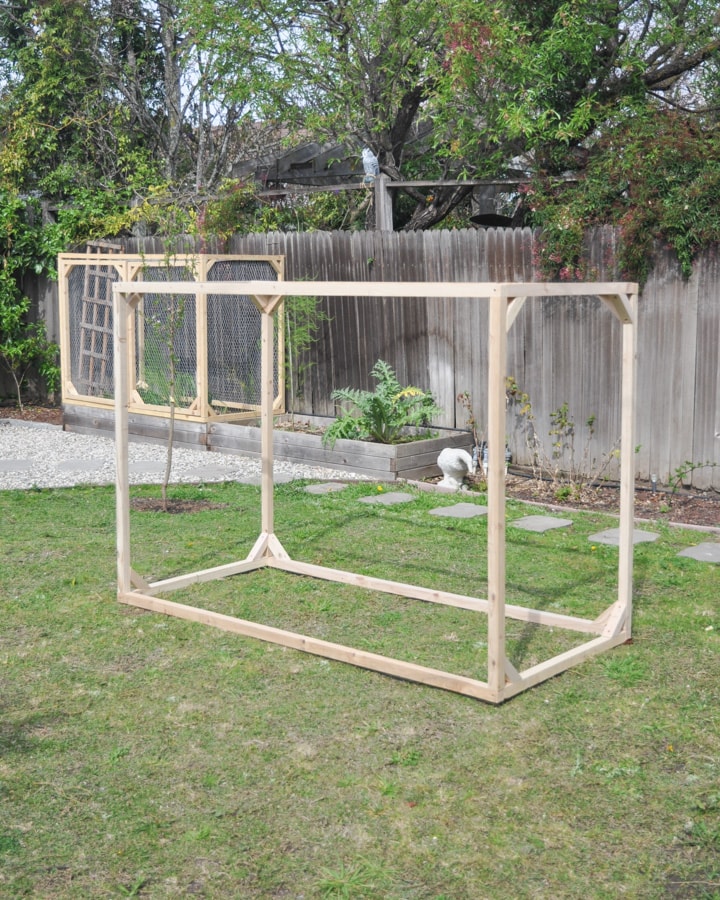
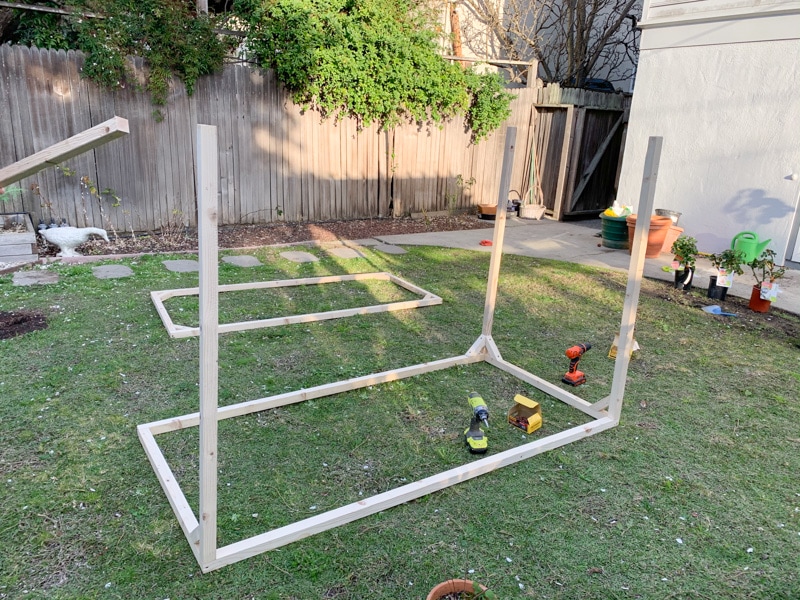
We started by building the back side first, reinforced it with braces on four corners, then move to the front side. Note for the front side of the garden bed cover, that you’ll want to skip reinforcement to leave space for doors.
You can reference my video to see how we were assembling the frame.
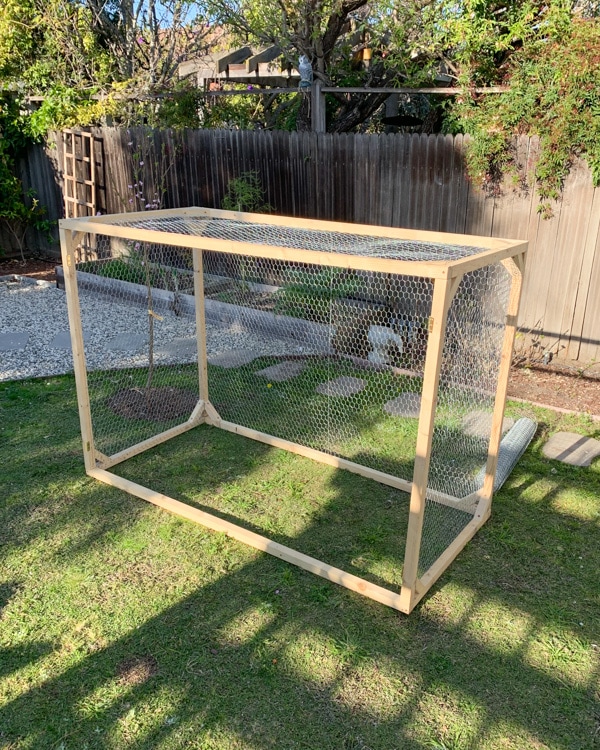
It’s recommended to dry fit your frame on top of your raised bed to make sure the cover fits well.
After assembly, you should have the basic frame structure of the garden bed cover and a pair of doors. For each door, we have all four corner reinforced with the braces. Now you are ready to attach chicken wire, which is also called poultry netting.
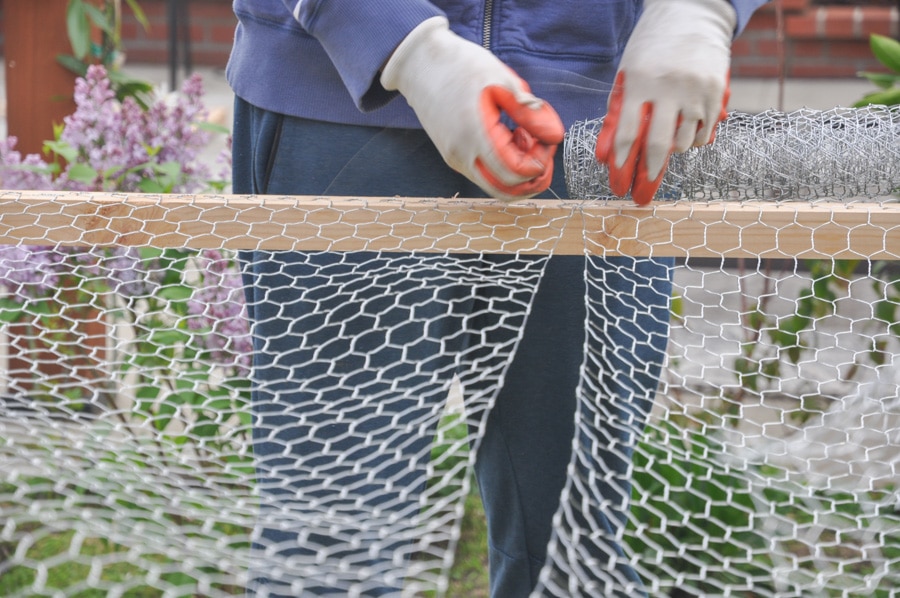
Step 3. Attach chicken wire.
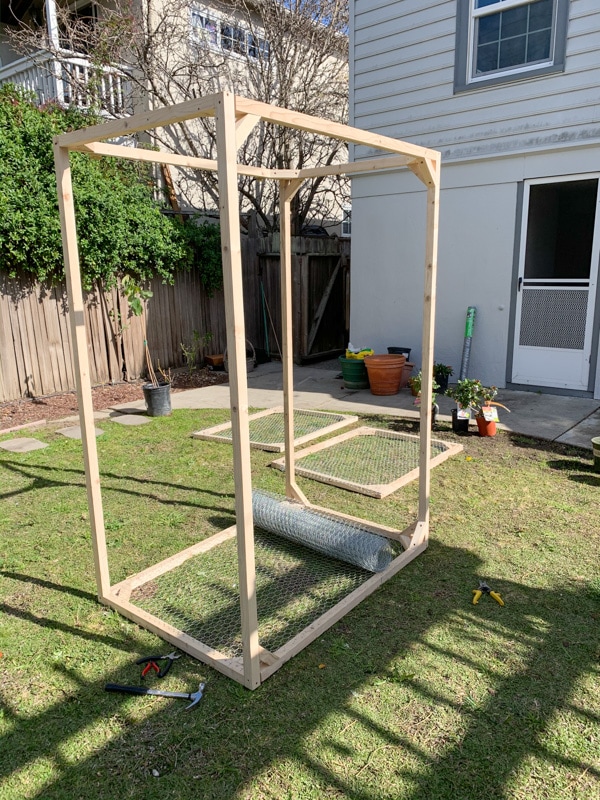
To handle chicken wire, wear gloves to protect your hands. Note the main animals I’m trying to deter are squirrels and mouse, if your garden animal have stronger teeth, consider using garden fence such as this one.
Because my raised bed is 3′ deep, I’m able to lay 3′ wide chicken wire along three sides of the frame continuously without cutting it – from one side to top, then to the other side.
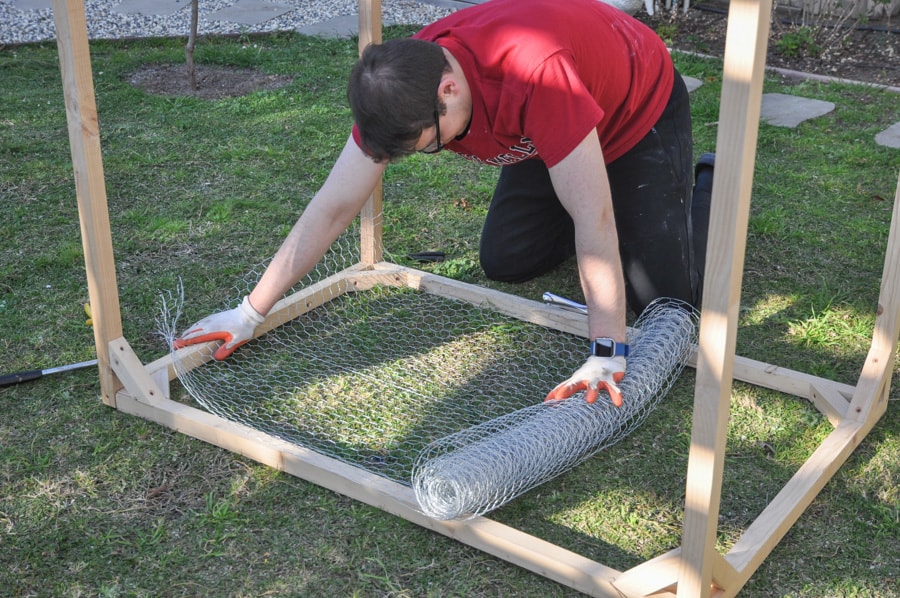
To attach chicken wire, we used stainless steel staples to make it weather resistant.
We used a manual stapler because it is cheaper, but you can use electric stapler as it will make your life a lot easier.
Most of the time the staples won’t go all the way in the wood (at least for our manual one), so we used a hammer to hammer them in more for security.
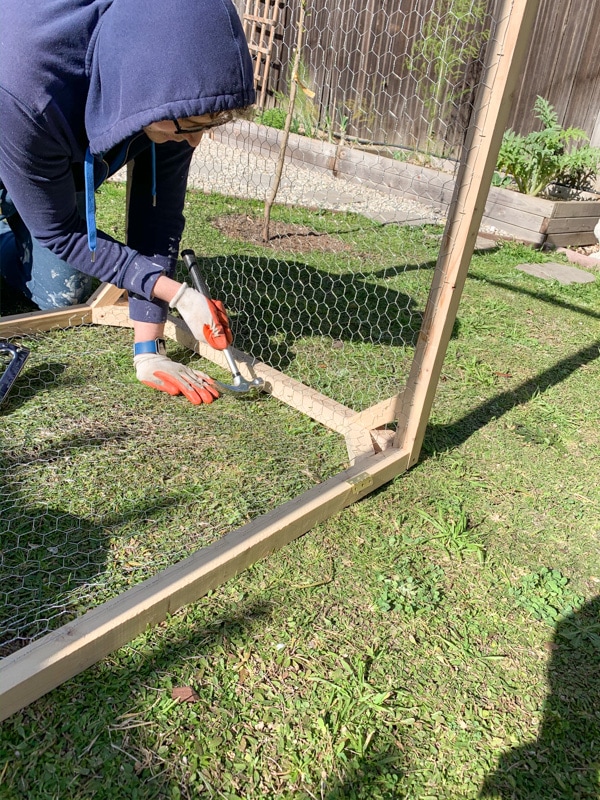
For corners with braces, cut the chicken wire with a wire cutter, then staple them with exterior grade staples.
I attached chicken wire from the inside for the look of it and to conceal the raw edges.
You can also attach the chicken wire from outside. In fact, I think attaching from outside would produce a more solid construction, so things that fall on top of the cage(fruits from the tree) won’t cause it to detach.

For the back side (opposite of double doors), we used two panels of 3′ wide chicken wire, attaching them vertically, then used the extra wire which came with the rolls to weave these two panels.
Trim the excess chicken wire with a wire cutter.
Although both chicken wire and my raised bed is 3′ wide, there will be some extra chicken wire hanging out. I cut them and bent them with a plier to remove the sharp edge.
I went into detail in the video on how I dealt with sharp edge after cutting it.
We Attached chicken wire/poultry netting to all four sides of the garden cover frame, leaving front side and bottom side free of chicken wire.
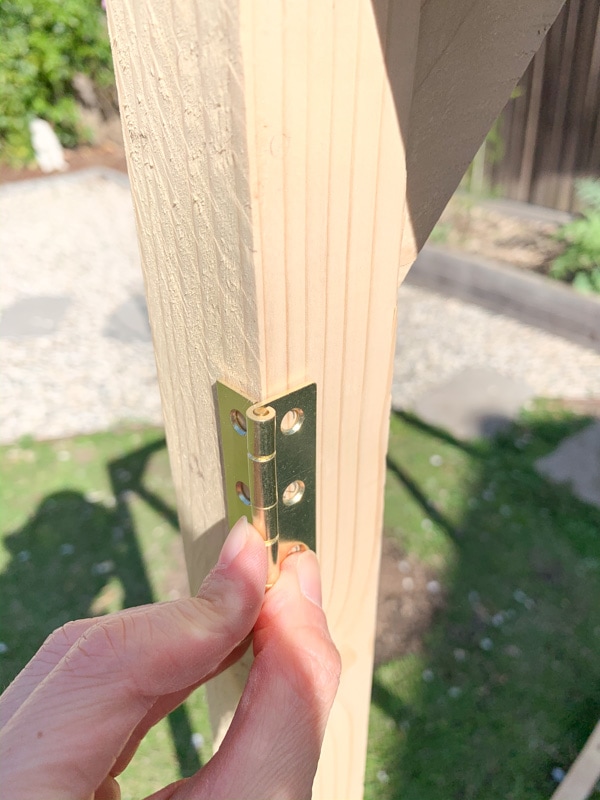
Step 4. Install hinges and barrel bolts
Now attach hinges and barrel bolts to your raised garden bed cover. I used brass ones because they are more weather resistant than some other materials.
To ensure doors open widely, I unfold the hinge to its openest position, and marked the holes on the frame. Then drill and attach the hinge to the frame. I used 4 hinges per garden bed cover (2 for each door).
After that, I attached each door to the hinges, and test to make sure it opens and closes smoothly. It is recommended to attach the doors after you place the garden cover on top of your raised beds, since your garden bed may not be completely leveled.
Once the doors were attached. I installed the brass barrel bolts, one per door.
I placed the longer part of the barrel bolts on the door because there’s more vertical space. If that’s the case with you, make sure you get the barrel bolts that can lock in position when installed that way.
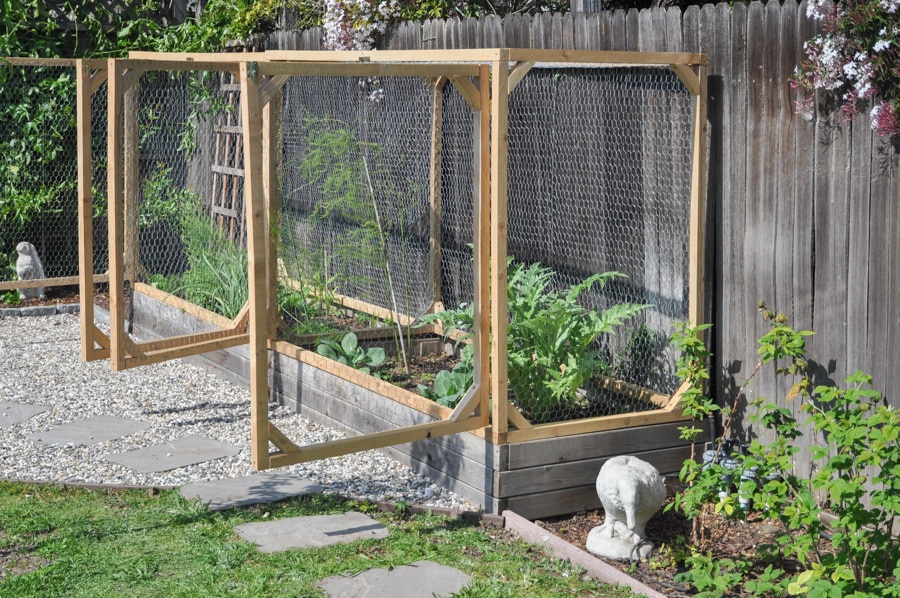
Step 5. Attach garden bed covers to your raised beds
To attach the protective covers to raised garden beds, I simply let the cover sit on the raised bed structure.
Originally I was planning to add a couple screws to attach the bottom frame to the raised bed, but I skipped it because the cover’s weight seems to be enough to hold it in place just fine.
You can attach this garden bed cover by screwing it into the raised bed. If you need to separate the cover from raised bed often, you can use a few barrel bolt to hold them together – which I learnt from one of my readers.
Step 6. Test, tweak, and enjoy your DIY garden bed fence
That’s all the steps for this DIY garden fence and you made to the end. At this time I’d like to suggest you to test our the doors and hinges, making sure everything function well.
If there are any glitches, don’t be afraid to tweak it until things open and lock smoothly. I did some tweaking on the door hinges and barrel bolts until the door open and close well.
So that is it! I hope you enjoy this DIY raised garden bed cover tutorial and leave me a comment if you have any questions. Garden bed fences are an essential way to keep unwanted animals out of your garden.
Get the Build Plan
Most of the instructions for this DIY project are included in the blog post above—but I know it’s a lot to scroll through. If you’d prefer something more convenient, you can grab the printable DIY Garden Bed Cover Build Plan for just $4.99.
The build plan includes:
- Step-by-step instructions with expanded details
- A clean, ad-free layout formatted like a booklet
- A cut list calculator that generates a custom cut list based on your garden bed dimensions
It’s designed to be easy to print and bring along when shopping for materials or building your cover.
👉 Click here to get the build plan and calculator
Tips for building a large garden protective cover
If you are building a raised garden cage with one dimension longer than 6 feet wide, consider adding middle pieces to reinforce the structure.
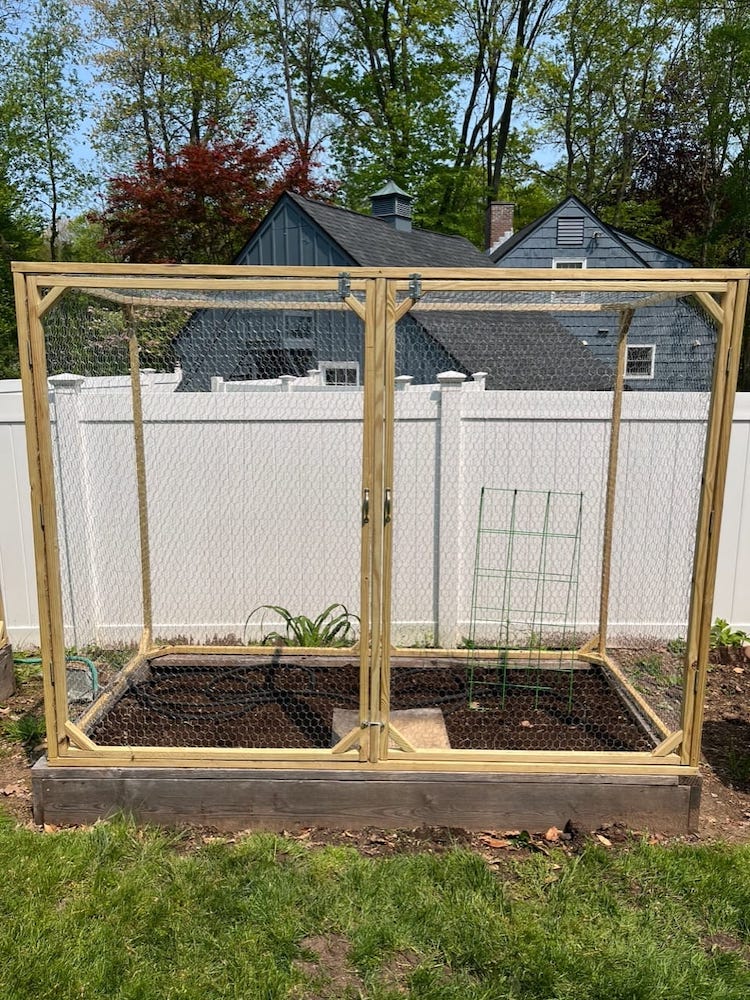
This photo shared by my reader Mary is an awesome example for inspirations.
Her raised bed cage is 8′ wide, 4′ deep and 6′ high. She added supporting piece to back, top and the front between doors.
She also mentioned this enabled her to attach 2’ wide chicken wires without having to weave them. What a great idea!
DIY protective covers for raised garden beds summary
Now you should be able to build your very own garden cage in the desired sizes to enclose your garden bed completely and protect it from animals. Building a fence for your garden bed can be a game changing in your gardening journey and best of luck with your project!
More Garden DIY projects
Easy DIY Trellis for Less Than $5
Pin it for later

I absolutely love this idea! It’s so practical and thoughtful to protect our plants from hungry animals. The step-by-step instructions make it seem doable, even for a beginner like me. Can’t wait to try this out for my garden! Thank you for sharing!
Would you say the 2×2 planks have held up and not warped over time? I’m curious as to how long your structure has been standing, and if you think it would have better longevity if you had used a larger type of lumber, such as 2×4.
I love this DIY idea for a raised garden bed cover! It’s such a practical solution to keep animals out while still allowing sunlight and rain in. I can’t wait to try this out in my garden—thanks for sharing the detailed steps!
What a fantastic idea! I love the design of the raised garden bed cover. It’s both practical and attractive, and I can’t wait to try it out to protect my plants from the critters in my yard. Thanks for sharing such a useful DIY project!
I have just come across your post and it’s EXACTLY what I’ve been looking for. I will 100% be doing this with my garden bed once Spring comes here in Australia. It’s so much nicer and neater than most other suggestions of flexible pipe and net, and so great for easy access! I love it!
So glad to hear you found it useful! Good luck with your upcoming project 🙂
Thanks for this build plan. I made one for the purpose of keeping out squirrels, the fattest raccoons you’ve ever seen, and chipmunks (which love to dig up and eat the roots of any potted vegetable plants they can get to). I made some adjustments: I used 2x2x8 pressure-treated lumber but not furring boards (I think I used 14 total?) Also I used a regular drill bit, not a spade bit, and used hardware cloth with 1/2” openings instead of chicken wire (chipmunks are tiny!). As I made mine a bit taller than yours, I found it’s very easy to just lay some extra 2×2 pieces crosswise across the top of the cage and suspend hanging basket planters in the interior. I’d like to add an extra vertical support beam to the rear cage panel, just to beef it up a little with the extra weight of my hanging baskets and roof bars, but it’s not truly necessary. Also, if you’re intending on staining/watersealing your cage, it would definitely be easiest to stain all the pieces before adding your cage mesh panels.
Also, notes for anyone else who is completely new to anything woodworking-related: try to check the pieces of wood you get to avoid ones that are very bent, or that have big knots or splits in them. I used some that turned out to be very bent, and while I was able to secure them in place, they are still noticeably out of shape. I found it super helpful to label which side of the cage frame was going to be the front panel with the doors (just by putting colored masking tape on those pieces), since I ended up rotating it frequently and then losing track of the orientation. Also, miter saws (which are recommended in the build plan) are very pricey, but you may be able to rent one from your local hardware store if you ask customer service. I learned how to use a circular saw for this project, since that’s what I had on hand, but there’s certainly a lot of room for error and for injury.
And finally, to anyone else who’s never worked with wood in their life but wanted to make this: you can do it!! I did!
Thanks for sharing Sarah! Those tips are great 🙂
Thanks for the design Kelin.
Your frames made it to Australia!!!
We’ve lots of issues with Possums, Kanagaroos and Bandicoots eating our veggies and fruits. Was going to put up plastic nets then found your plans, bought the e-book…..fantastic. Turned out amazing.
We did use recycled wood we bought from house demolitions, and had some tough angles to deal with, but think they’ve come out OK.
Thanks for you idea and share.
Kim, Mark and Family
Here’s some pics for you shared in Dropbox (if it works!!):
https://www.dropbox.com/scl/fo/2trx5cdpaz0mtwemsk9x1/h?rlkey=obedewrflmouuzqidm91fap1o&dl=0
Oh, and we used Aviary wire instead of Chicken wire to try and deter some of the smaller critters we get round here…….thanks again
Hi Mark, it made my day seeing your comment and I’d glad my plan helped you to solve these problem (your garden visitors sound very cute, but I’m sure they don’t look as cute when destroying your plants lol)
And thanks for sharing your finished project photos – they look so good! Do you feel comfortable if I share your photos online? ( sometimes I share reader project highlights, or as testimonials)
Hi. The hinges you used are different than those at the Amazon link. What size and radius hinges did you use?
That’s because the hinges I bought is not very high quality, but the same and dimension are very similar.
So you used untreated furring strips? How have they held up to the elements?
Excellent article, thank you! I’m going to give this a go as soon as spring comes to New England. Have you given any thought to deconstructing it for the winter months? I’m thinking of a way to build it so that I could take it apart before harsh winter months like Ikea furniture, but perhaps I’m overthinking it. It would be cool though.
Oh interesting idea. I’ve never thought of it actually because I also grow things in the winter there.
I just made a version that you can disassemble. Here’s a photo: https://dlee.zenfolio.com/img/s/v-10/p1780736064-6.jpg
I used 1/4-20 bolts and wing nuts to secure it. It takes a lot more wood since each panel has to stand alone. And the front frame is a bit unstable by itself (mine was 8′ long). But once it’s all bolted together it’s solid enough.
https://dlee.zenfolio.com/img/s/v-10/p1810765199-6.jpg
https://dlee.zenfolio.com/img/s/v-10/p1678521212-6.jpg
These links are protected. How can I get permission to view them?
Do you know an approximate weight of one finished cage? Thanks.
Hello! How does the structure hold up during thunderstorms and high wind?
Do you recall how much you spent on building materials?
Hi – Love this design & think it will fit my needs. Just getting into woodworking & was wondering why 73” for the frame dimensions vs. 72”. My bed is a 4’ x 12’ and I was going to create 2, 4 x 6 covers. I also, was going to change the depth dimensions to 48”, as well as, create 4 doors to access the frame on both sides. In addition, I plan to, not use wire chicken wire, but, the smaller holes that comes in the plastic version; unless there is now something easier to handle. I’m an older, Single woman and think that’s best for my limited abilities. Appreciate explanation for the 72” vs. 73” ? Thank you.
Hi Kelin – a friend passed along this terrific idea and I want to try it. We have a cold frame my husband built but the squirrels get in from below! I see you didn’t put chicken wire over the bottom. Did you do anything to deter digging critters?
Planning to build a 3’ x 6’ x 4’h garden. IWe are on a slight slope with red clay. If I make a cedar foundation with 2 x ? , can I use cedar for the frame…afraid of warping. Just don’t want wood to warp or leach chemicals into garden.
I bought the ebook and have used the calculator, but I’m unsure if the lumber for the braces is included. Can you verify? Also, how long do you cut the braces? Thanks!
I cut them around 6-8 inches long. the braces is not in the calculator because it doesn’t have to be accurate at all – more of a personal preference.
hardware cloth works better if rats are among the marauders. They also will dig from below the raised bed. Probably hardware cloth on the bottom, stapled to the wood would deter diggers.
I’m so happy to have purchased and implemented this cover over my raised garden beds.
I’m wanting to cover the bed covers with green house plastic to grow further in the fall.
I was wondering if you have any suggestions on what I could do to hold this plastic in place to these covers? Thank you!
I haven’t had experience with plastic coverings, maybe try staples ?
Hello!
We love your design — thank you!!
For the 45 degree braces — is there a reason that you are countersinking the screws? Do we need to drill the holes with a spade bit?
Thanks you!
it’s because my screw is not long enough given it has to go diagonal, also it creates a cleaner look
Thank you! Did you use 2 1/2 inch nails? or 2 inch nails? I think the directions list both sizes , , , I wasn’t sure if you used different sizes for different areas. Thank you!
yeah I cannot remember on top of my mind, also that will depends on how deep the countersink hole is.
Hi Kelin, I am trying to purchase your How to Build A Raised Bed Cover eBook using PayPal, and it is not going through?
Thanks for letting me know and sorry to hear that. were you purchasing from this link? https://hydrangea-treehouse.myshopify.com/products/raised-bed-cover-ebook
If so, could you try again and if it doesn’t work, it would be great if you can email me the screens before and after so I can help you. thanks [email protected]
The link you sent me worked! I was trying to purchase from the link on YouTube; that didn’t work, it would not process, just kept spinning. Anyway, great idea and thank you for the design!
Glad to hear that and have fun with your garden project! And thanks for flagging it – I forgot to update the youtube link.