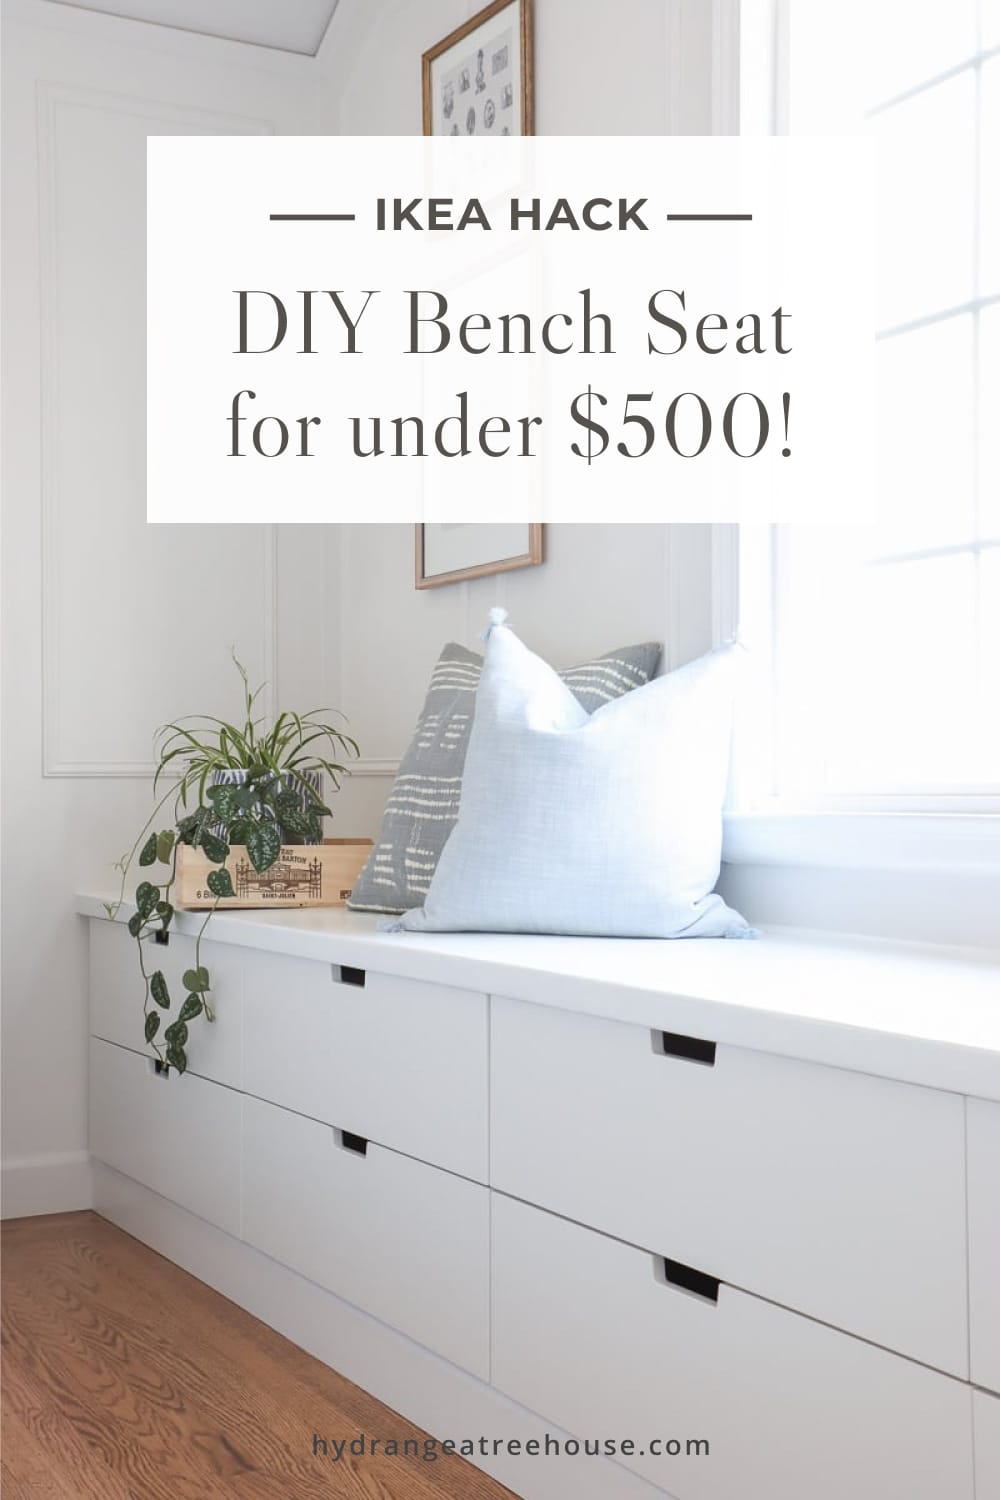
DIY IKEA Window Seat with Nordli Hack
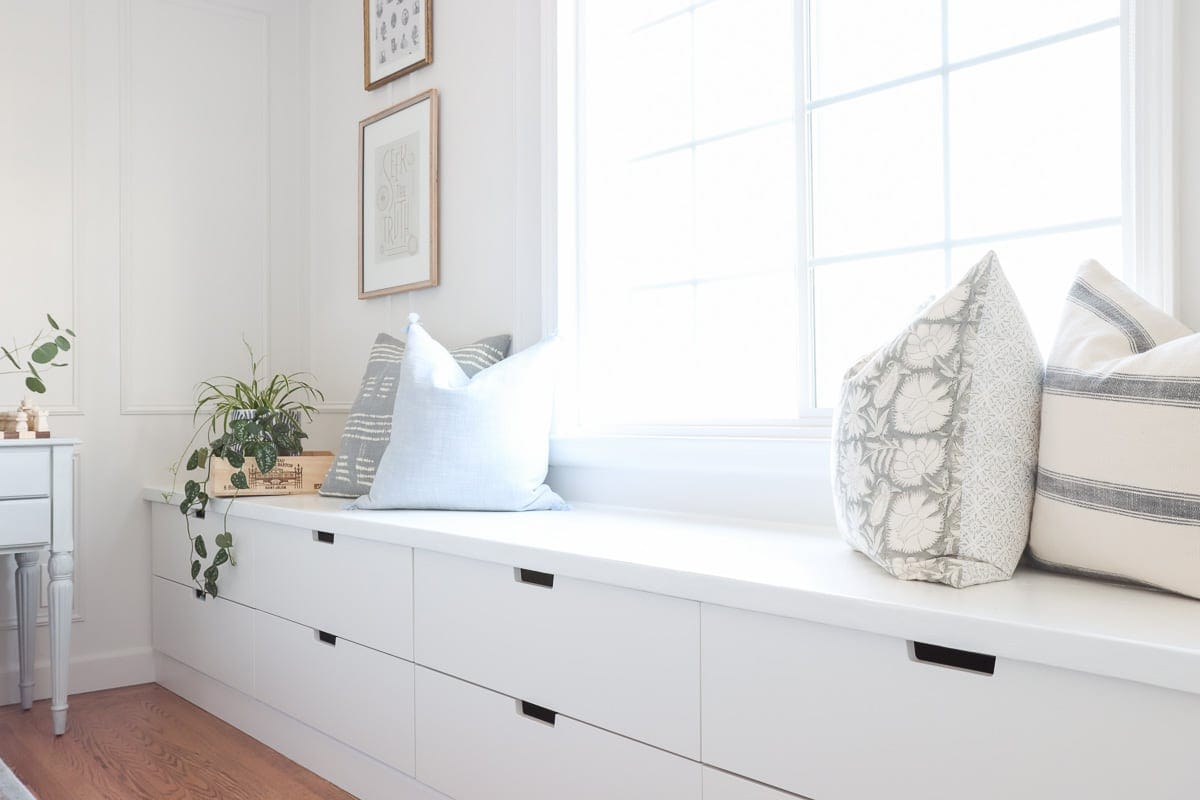
A step by step tutorial of DIY IKEA window seat with storage. This is window seat built by hacking IKEA Nordli drawer units. It is so affordable that we got the whole window seat built-ins done for under $500!
If you are looking for affordable DIY bench seat with tons of storage, keep reading and watching (step by step video inside) !
Btw, if you’d like to see more ideas on making your home functional and beautiful, be sure to follow me on Instagram.
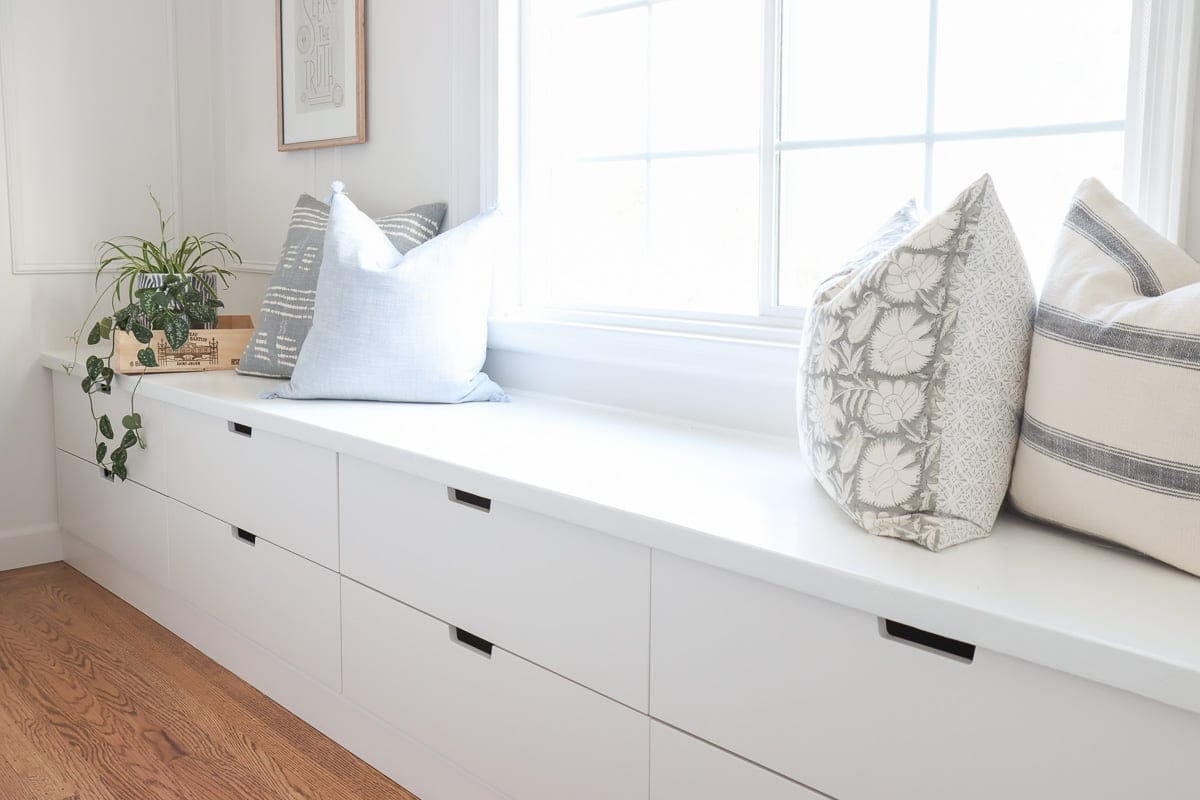
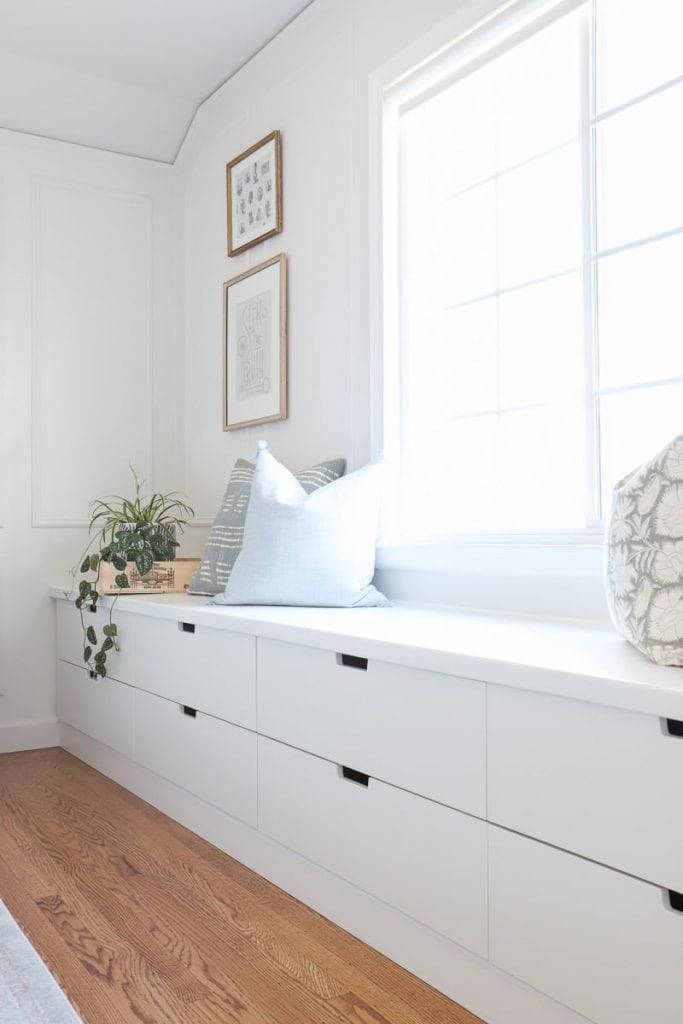
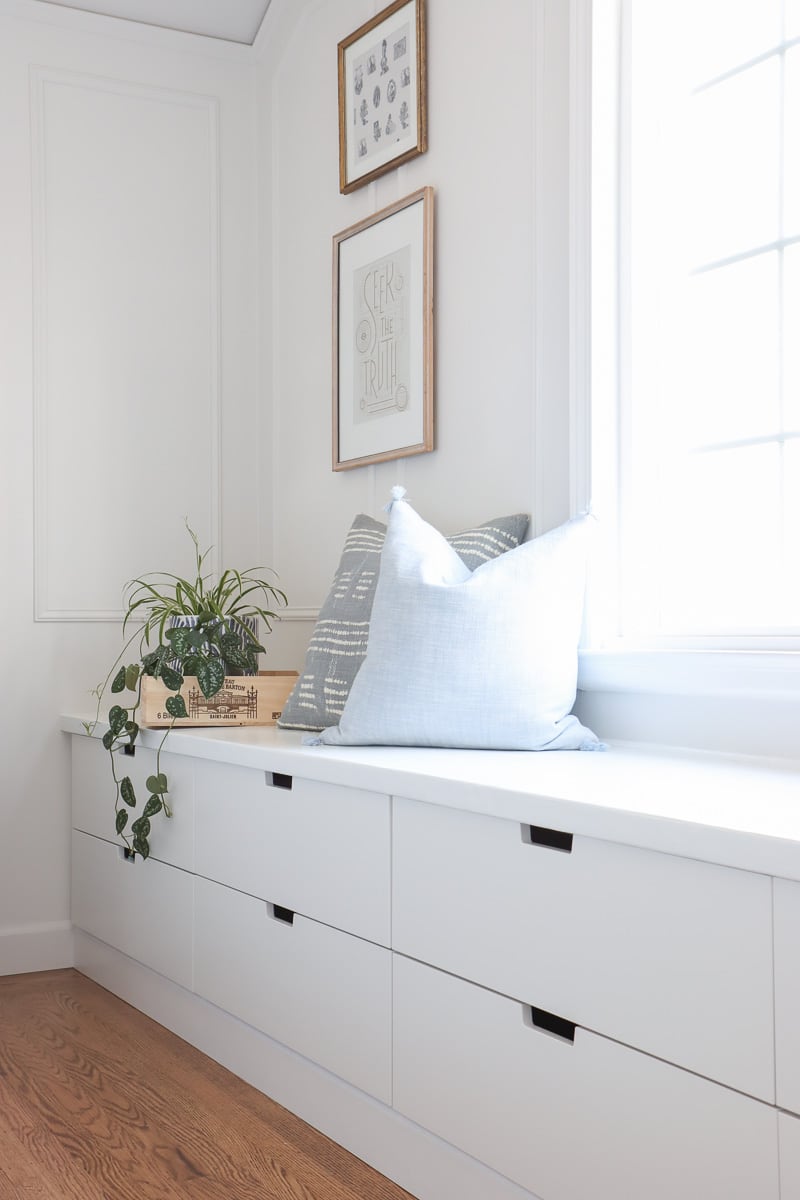
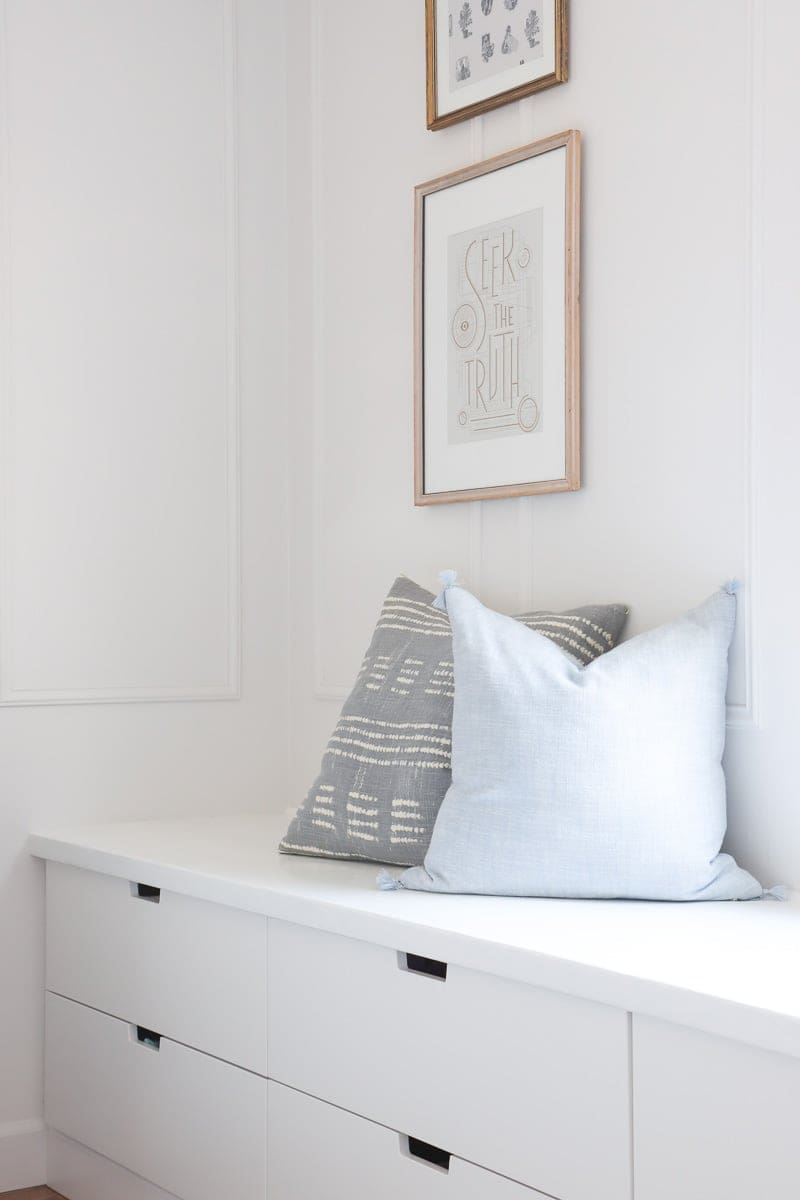
DIY bench seat with Ikea Nordli hack
DIY bench seat with storage is something I’m always interested in because it makes such a big impact on a space. In fact, one of my popular posts on this blog is a DIY Ikea Banquette tutorial for my dining room. So this time, I’m sharing another IKEA bench seat hack, but for my bedroom window seats!
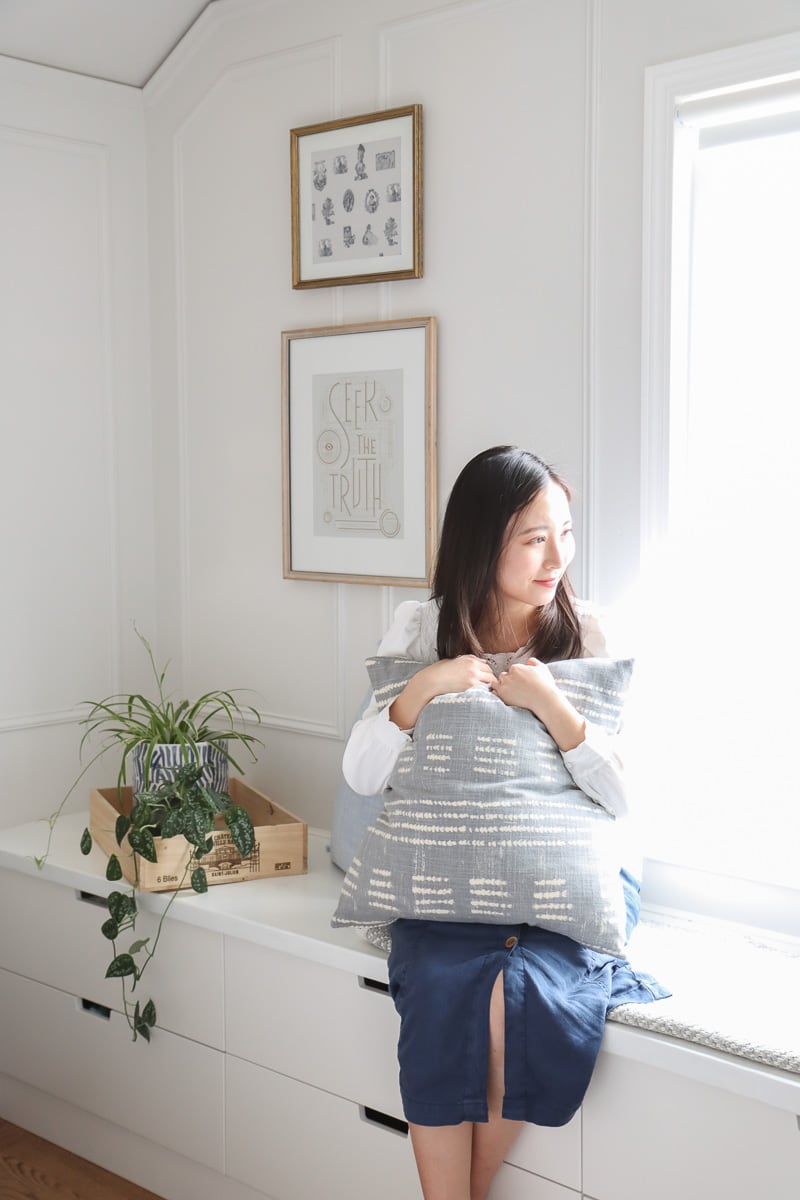
I used Ikea Nordli 2-drawer chest and hacked it into a super long window seat with storage in my bedroom, because I have some awkward empty space that is impossible to use well. Also I’d like to have more closed storage to release some pressure from bedroom closet.
This DIY Ikea window seat project is so versatile that not only you can use it as a window bench, but it’s also great for dining room banquette, breakfast nook, or other bench seat needs for your home. In my build plan I offered some ideas on changing the height to be more like a dining bench.
Interested in building this project?
Take the hassle out of your DIY window seat project with the comprehensive build plans for $4.99.
📖 What’s Included:
- Efficient Format: All instructions neatly organized in a PDF book format.
- Ad-Free: No interruptions, just a focused building experience.
- Portability: Print it or keep it on your device for on-the-go reference.
- In-Depth Guidance: Cut list, precise measurements, detailed instructions, 3D diagrams, and valuable tips.
DIY window seat with Ikea Nordli hack project cost
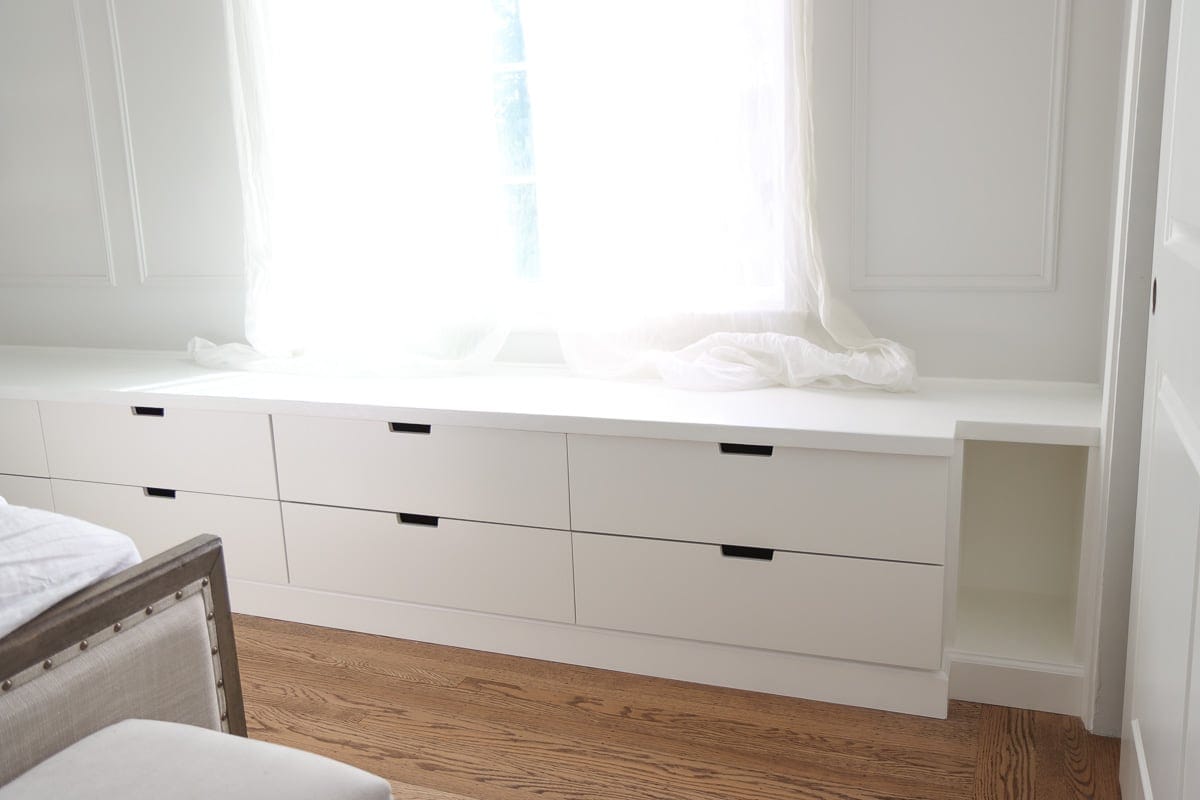
To build this IKEA bench seat with storage, I’m using their Nordli 2-drawer chest. You can also use Nordli 4-drawer dresser. I got the 2 drawer unit because I want to only use the drawers, and create my custom top and bottom to fit my space well.
This project is pretty affordable compared to hiring someone to custom build it for you or buying as a piece of furniture. Each of the Nordli 2-drawer units costs $90. With four of those and all the materials to make the customization happen, we got the whole project done under $500. Considering how much storage this bench adds to our space, I think it is a steal!
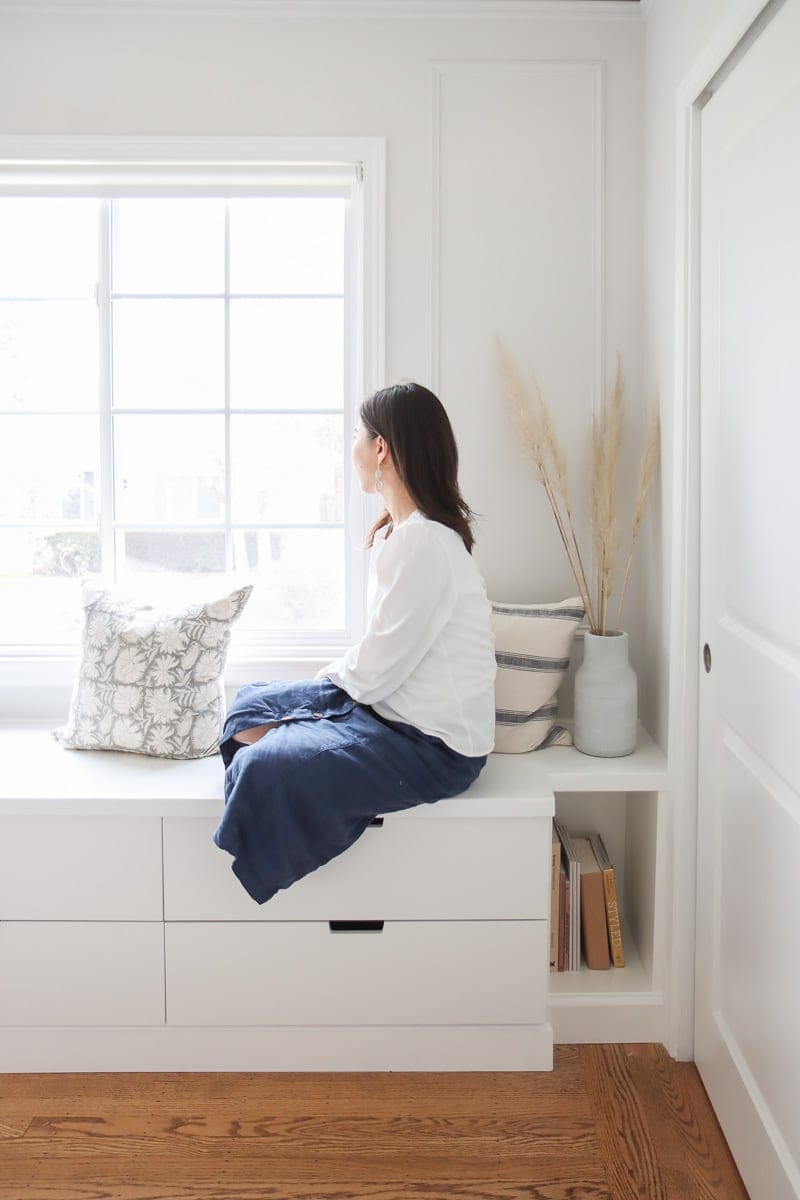
IKEA window seat with storage project measurement
Width: This will vastly depend on how many units you use and the space you want to fill. In my case, I built it to be wall to wall, so 11′ 6″ wide.
Height: 23 ½”. This can be anywhere between 20″ to 23 ½”. I talked about the customization on the height in details in the build plan.
Depth: 20″.
IKEA window seat hack modifications
While building this IKEA bench seat with storage, I made a few customization, or you can call upgrades, to make it fit my space better. Here’s a summary:
Raise bench seat height
I raised the height of Nordli dresser units so it serves more like a furniture piece, instead of a standard bench height. My finished DIY bench seat height is 23 ½”.
When used as a window seat, the height is less limited. Also I don’t have any other furniture on that wall so I’d like it to fill the vertical space more by having a slightly higher appearance.
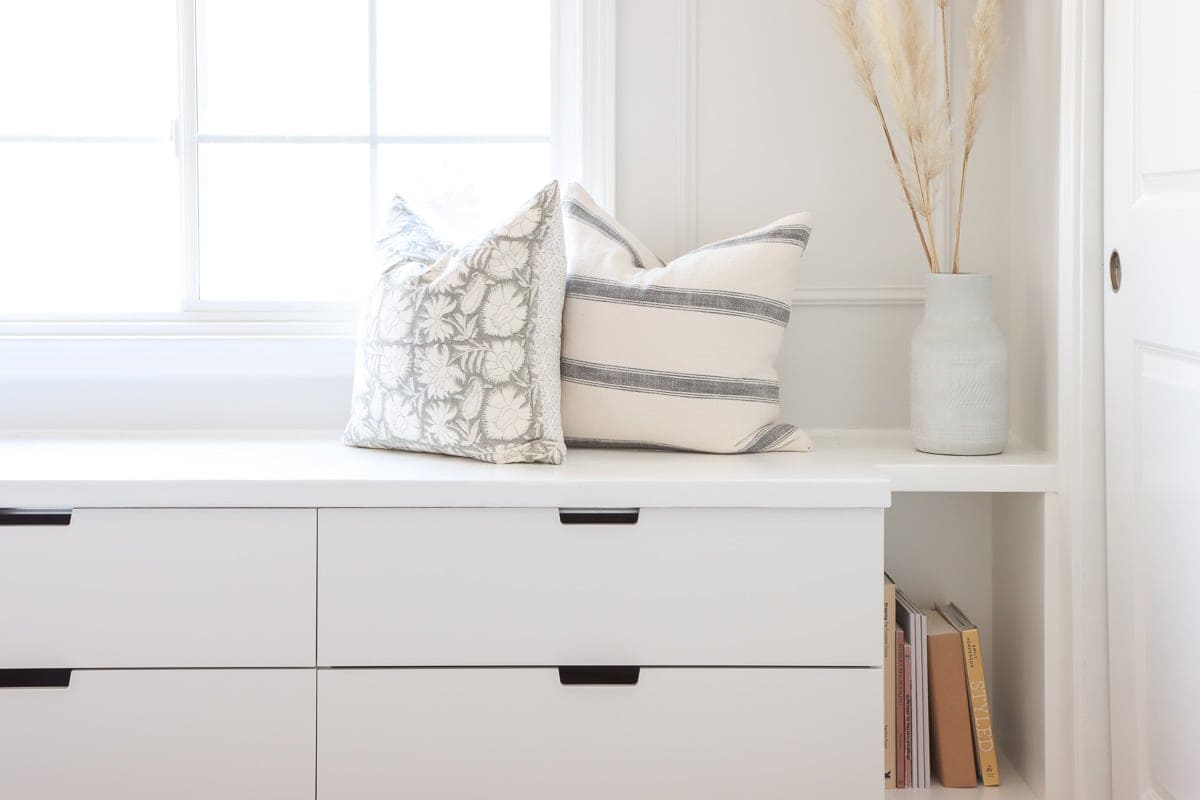
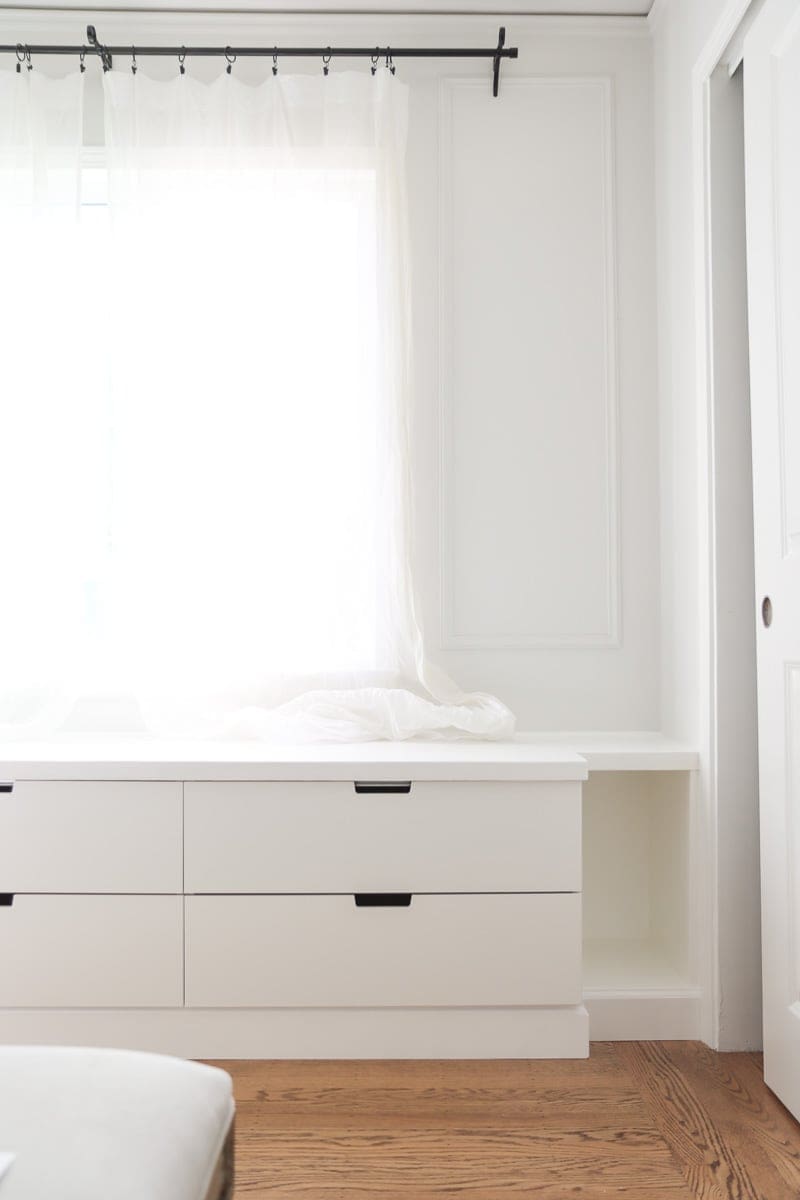
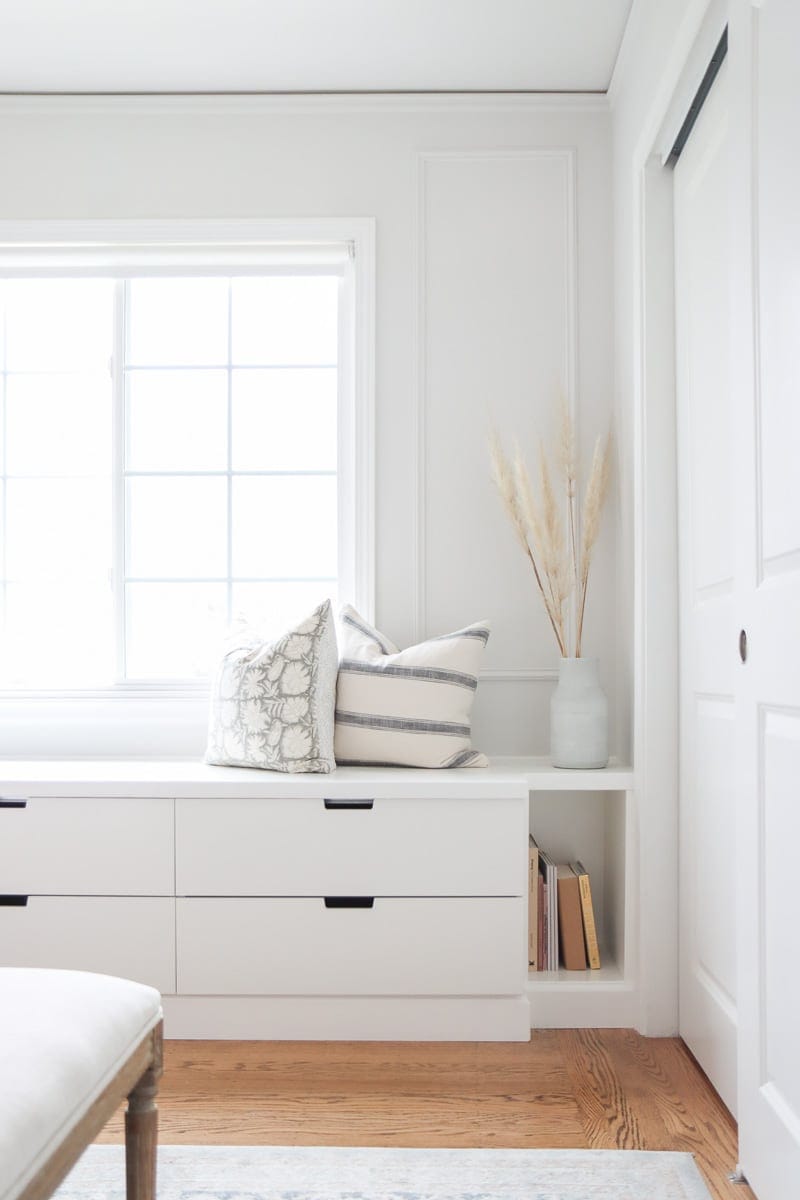
Add custom bookshelf to the bench seat
I created a custom book nook to fill the extra space because I want this window seat built-in to be wall to wall. This bookshelf has a shallower depth compared to Nordli dresser, because there’s a closet door on the wall to the right which limit the depth.
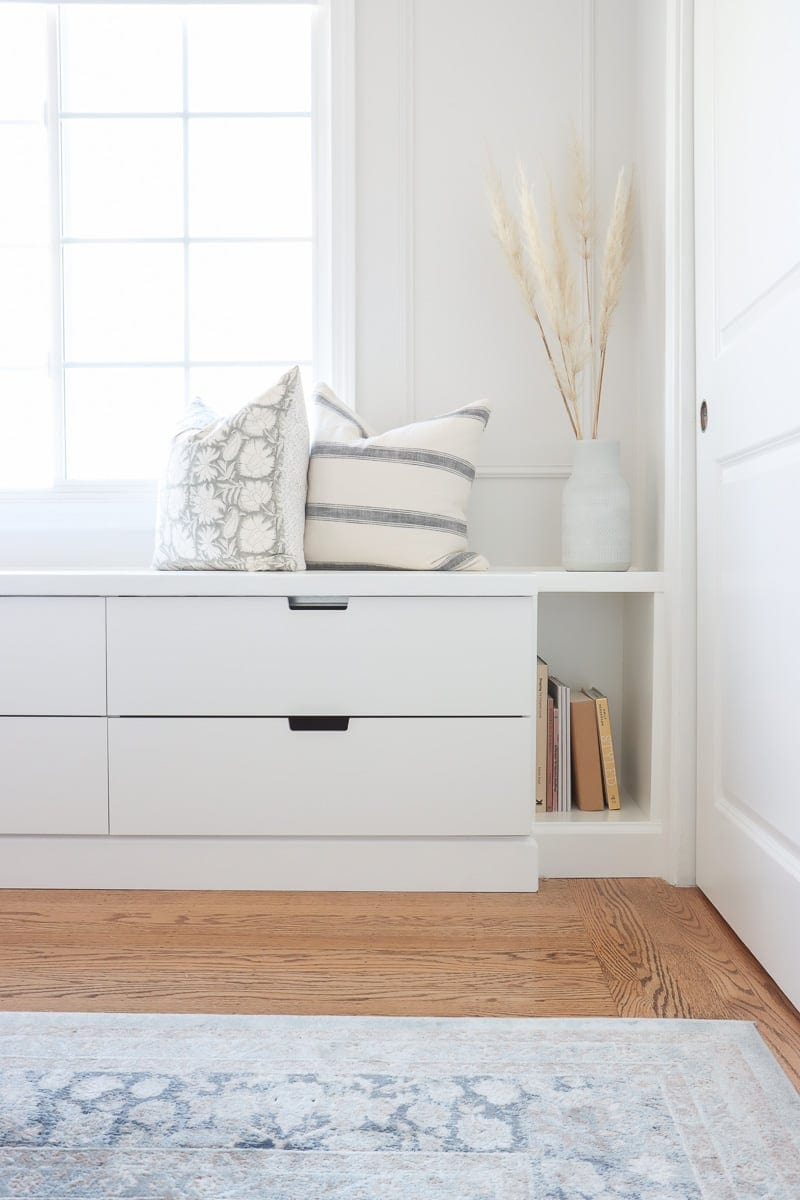
Custom bench top and power socket under it
I created a bench top for this window seat so it can handle a lot of weight, plus a more custom look. I also added an outlet box right under the bench top with a hinged door to hide it.
There’s a wall outlet that will be covered by this IKEA window seat, so adding a bench top power strip allows me to have access to the power and be able to plug in any small appliances or chargers.

Ikea window seat hack video tutorial
Here’s a full video tutorial of this DIY window seat with Ikea Nordli hack. I created this video walking you through my DIY process, and highlighted a few key points to make this project successful. You can click on the video below to watch it.
If you want to watch more videos like this, be sure to subscribe to my Youtube channel.
Ikea Bench seat hack materials and tools
Materials:
Ikea Nordli 2-drawer chest (color: white)
Tools:
DIY IKEA window seat instructions
Step 1. Assemble Nordli 2-drawer chest
I assembled IKEA Nordli dresser units following their instructions manual, but don’t add the drawers in yet.
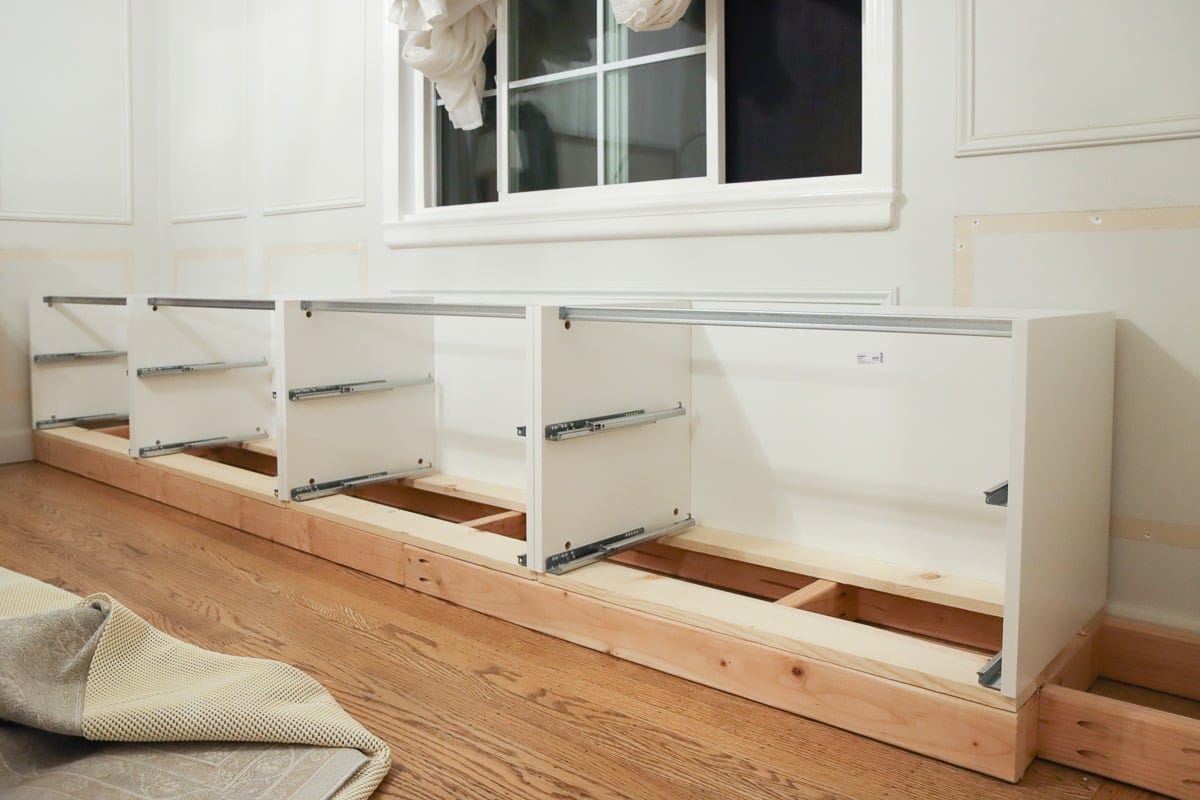
Then I placed all four boxes in my bedroom, to get a general idea of how they will fit in the space. This helps me to plan out how much extra space I need to fill up, and I will use the remaining space for a small book nook.
Step 2. Build 2×4 base for bench seat
Next step is to build a base for this bench to sit on. I used some 2×4 boards to build long rectangles with braces that the Ikea Nordli dressers can sit on.
I used a Kreg pocket hole jig to make pocket holes, and used pocket hole screws to connect all the pieces together.
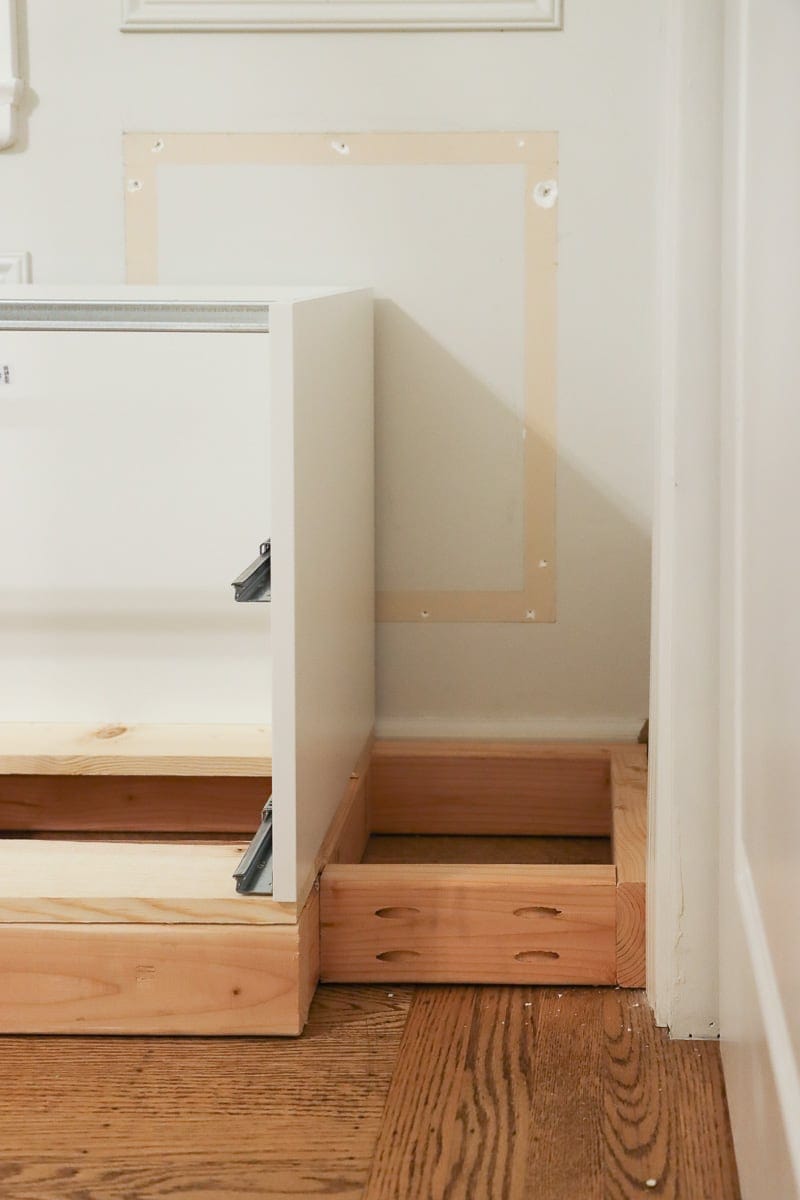
Then I attached the 2×4 base to my wall stud.

Btw, I kept my baseboard on the back wall because I plan to leave some gap between Nordli units and the wall to reroute the power outlet to the bench top, and later I will just use the bench top to cover up the gap.
Step 3. Add 1×4 boards to the Nordli frames
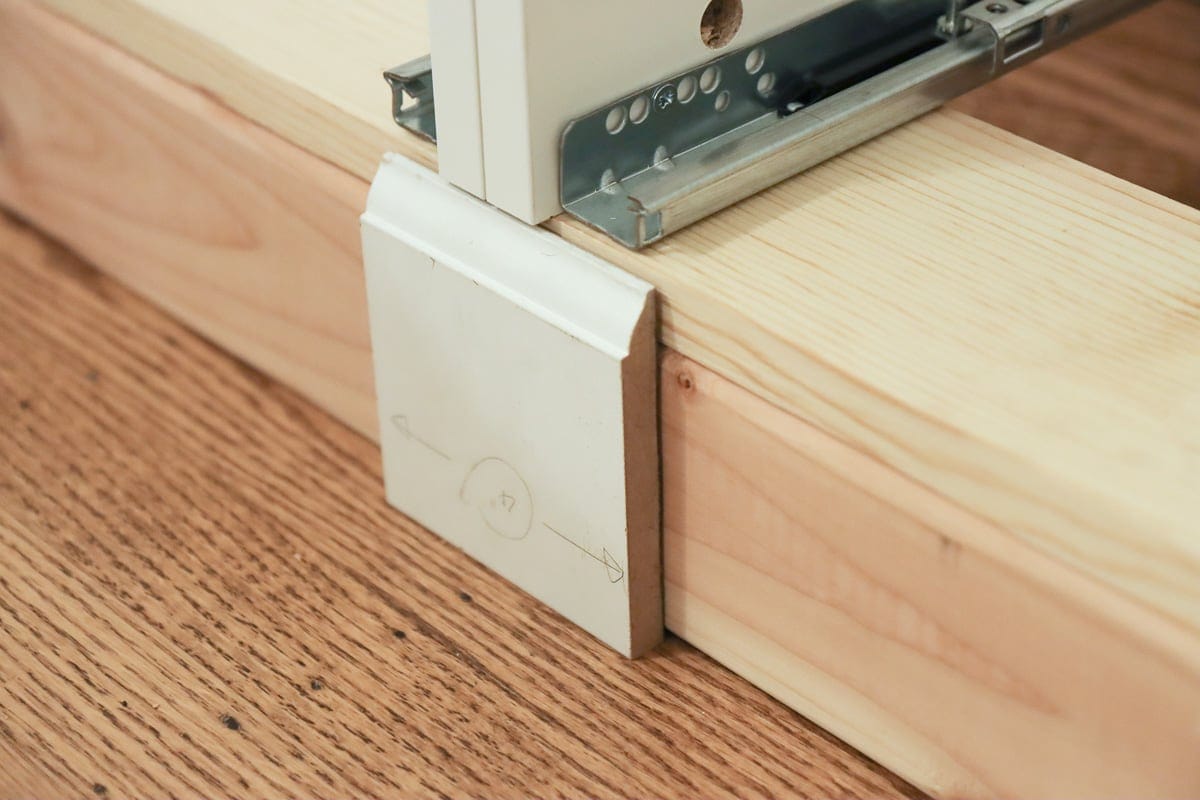
For the Nordli unit, I’m not using the standard Nordli dresser which has a top and bottom board. Instead, I created my own bottom boards with 1×4 boards from the hardware store, and I’ll use it to attach to the 2×4 base later.
I used two 1 x 4 boards and staple them to the drawer frame on the bottom with a nail gun. The front piece is slightly behind the front of the Nordli unit to give space to the baseboard top ledge. Later I’ll use a baseboard to cover it up.
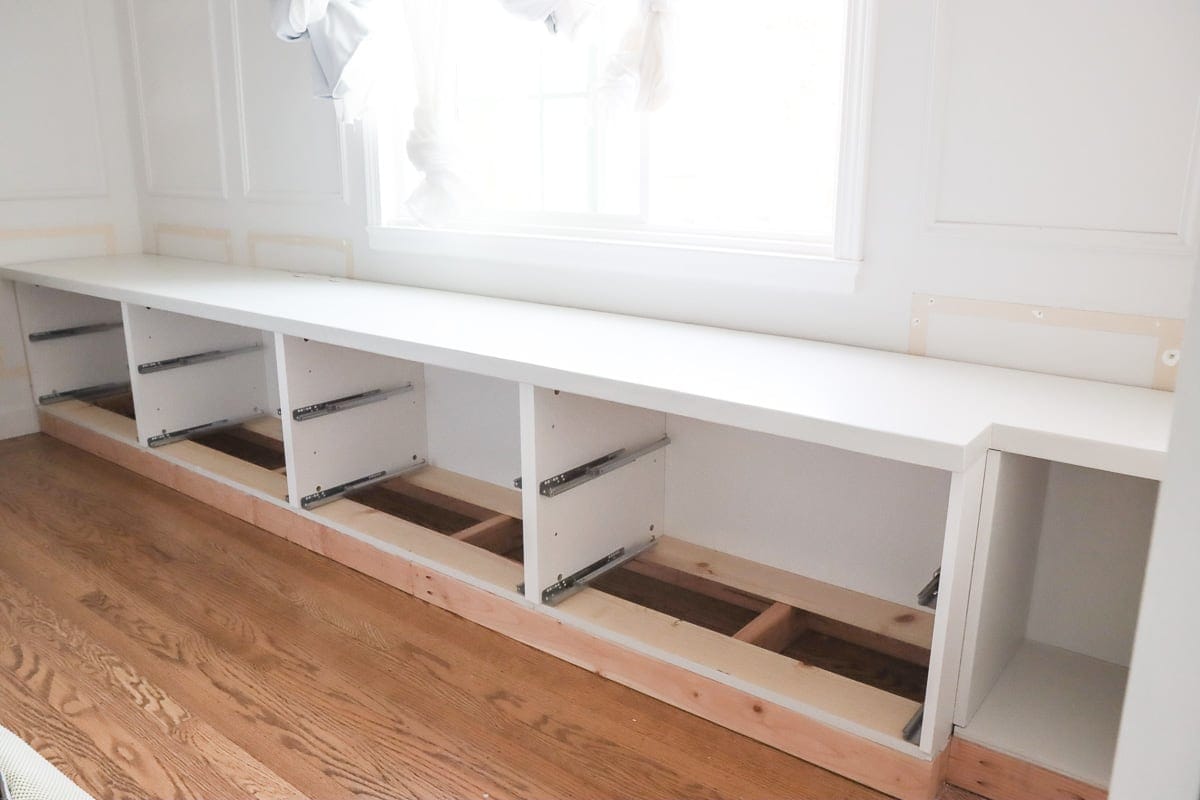
Then I put all the Nordli drawer units on top of 2×4 base I built earlier.
Step 4. Attach Nordli dresser to the base
Once the book nook is done, I attached all the Nordli dresser units together by screws. I also made sure to clamp them together so that their top is aligned which makes it easier to attach a bench top later.
I have a wall outlet that is right behind one of the drawer units. So I created a notch on the top of the back Nordli frame back so my power extension can sit on it below the bench top. Before attaching the Nordli unit to the 2×4 base, I also plugged in the power extension cord because there would be no space to do it later.
I attached all four Nordli drawer units to the 2×4 base through the 1×4 boards on the bottom. When I designed the base I made sure that there will be at least one vertical board around the middle of each unit to make it easier to attach.
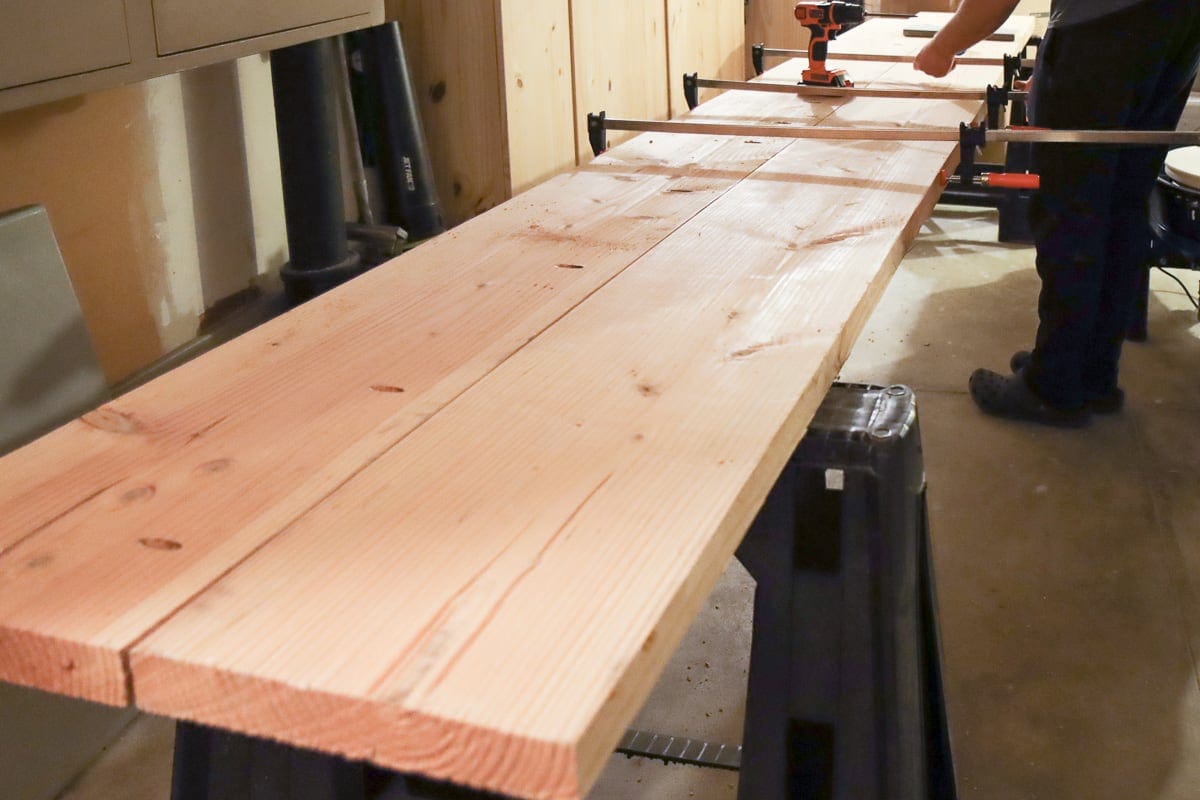
Step 5. DIY custom bench top
Now it’s time to add a bench top to this window seat. We Used two 2 x 12 boards from Homedepot that are 12 feet long. The reason we used the 12 feet board was because my wall is 11 ‘½’6″ long and I want the bench top to look continuous.
So for our super long window seat bench top, we joined two boards together with pocket holes and screws every foot of the length. We also added wood glue between them.
Note: I made a mistake that I used green wood instead of kiln dried, so my bench top actually shrunk a bit since the DIY. I would recommend getting kiln dried wood or use the plywood make your bench, like what I did for my DIY home office desk.
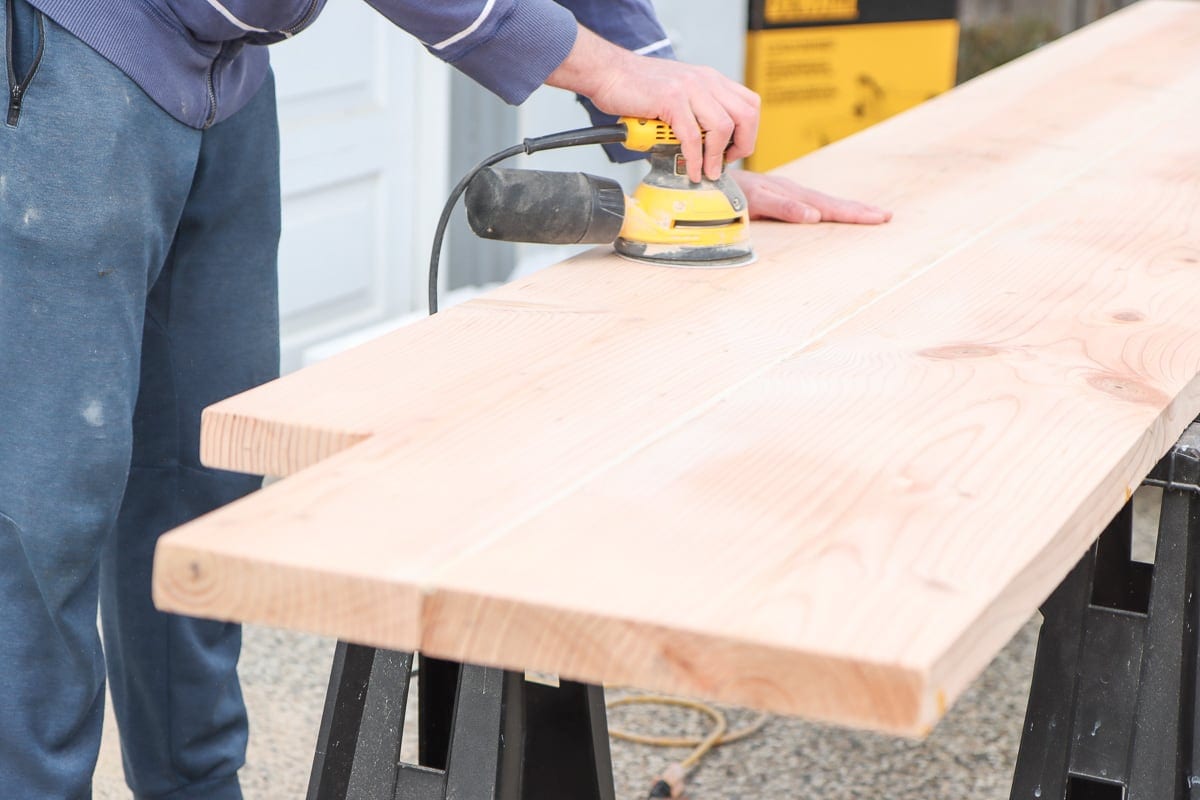
Then we patched it up using wood putty and sanded the surface smooth with an orbit sander. We gave it a few coats of white paint.
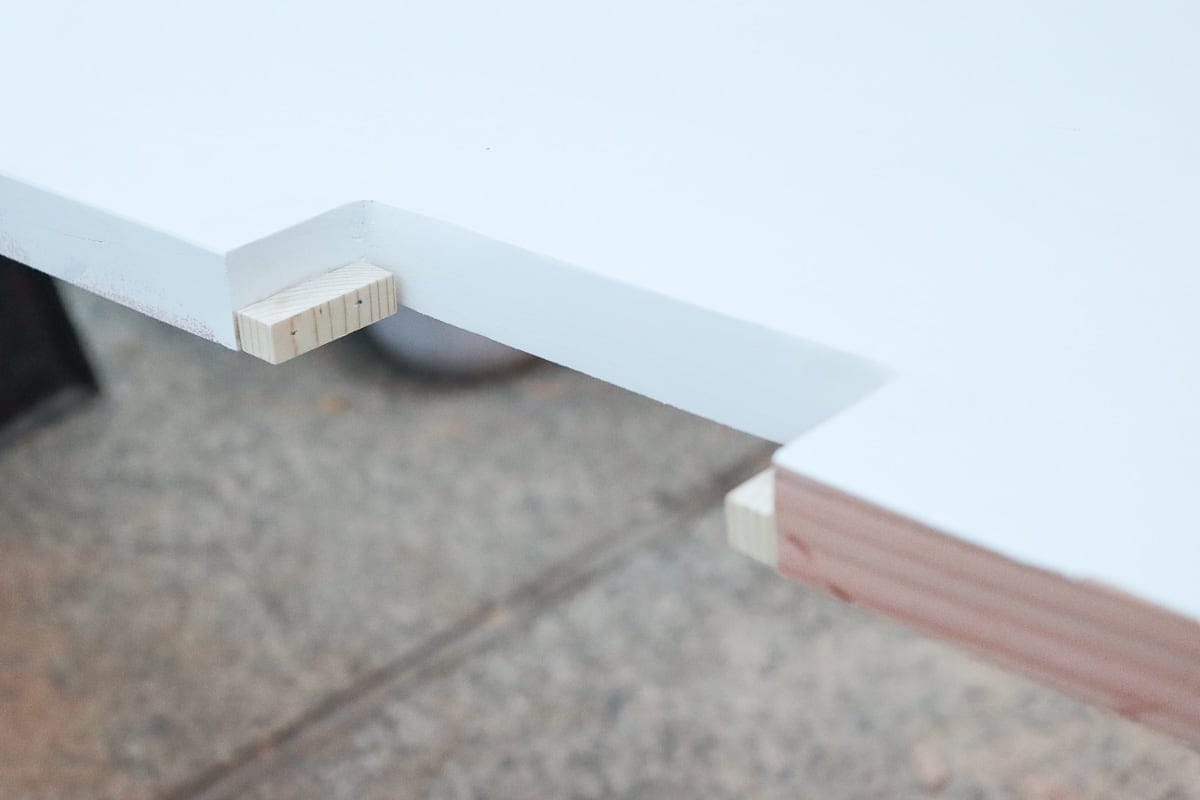
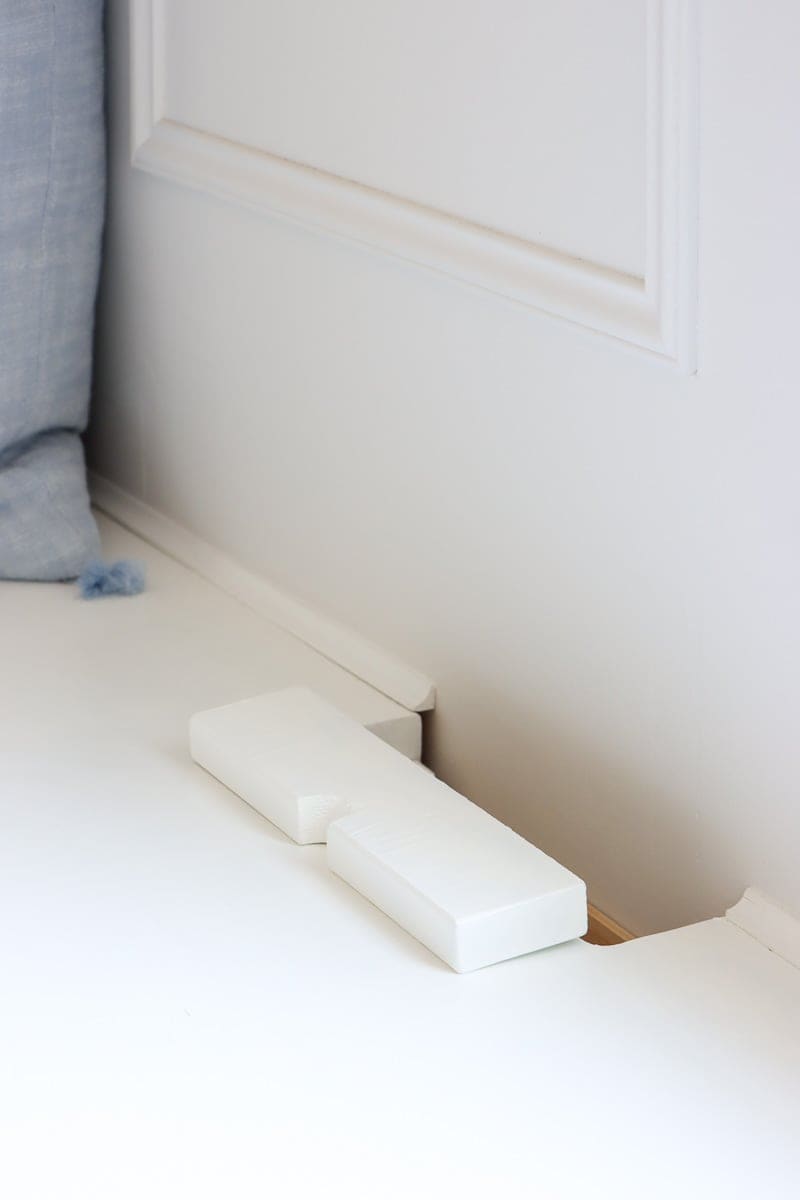
At this stage, we created a door mechanism so we can hide the power extension. I used cut out a half circle shape at the edge of the hinged door, so it is easier to open and close.

Then we moved this giant bench top to our DIY window seat in the bedroom. Moving it is not easy I would say as it is super heavy and long, but we did it!
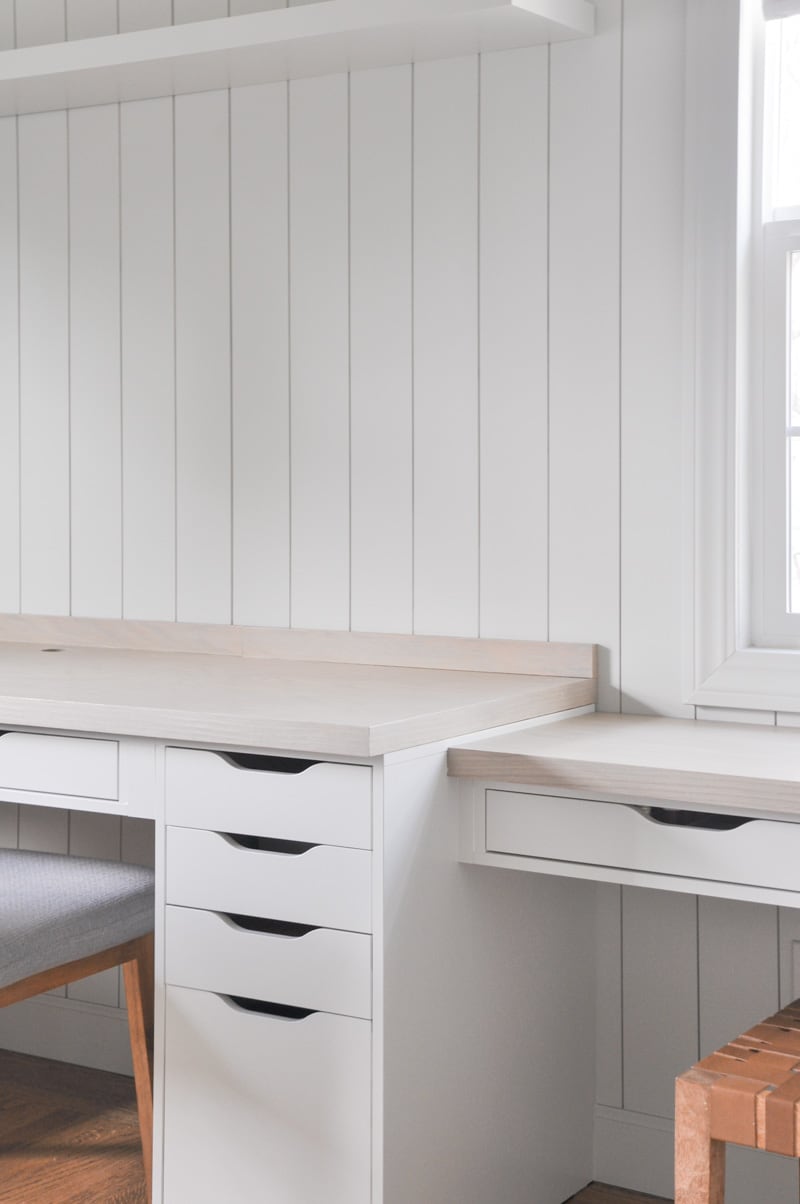
This is what it looks like after we added the bench top to the IKEA Nordli window seat. The bench top was pretty snug to the wall so we didn’t attach it to the Nordli box frames below it. If you’d like to attach it, you can use L brackets to do so.
I also finished framing out the book nook before adding the bench top.
Step 6. Add trim and finishing touches to bench seat
Now the basic structure of this storage bench is all done, it’s time to add the finish touch so this DIY bench seat will look super custom and pretty.
I have planned to cover the 2×4 base, so I cut out some 4 1/4″ baseboard to size. The baseboard I used is the same of what I have in this room so it looks more uniform. I attached the baseboard using a brad nailer.
My house is really old so the walls are curved. To seal the gap between the bench top and my wall I got some shoe moldings. I attached them at the edge where bench top and wall meets, except the power extension part.
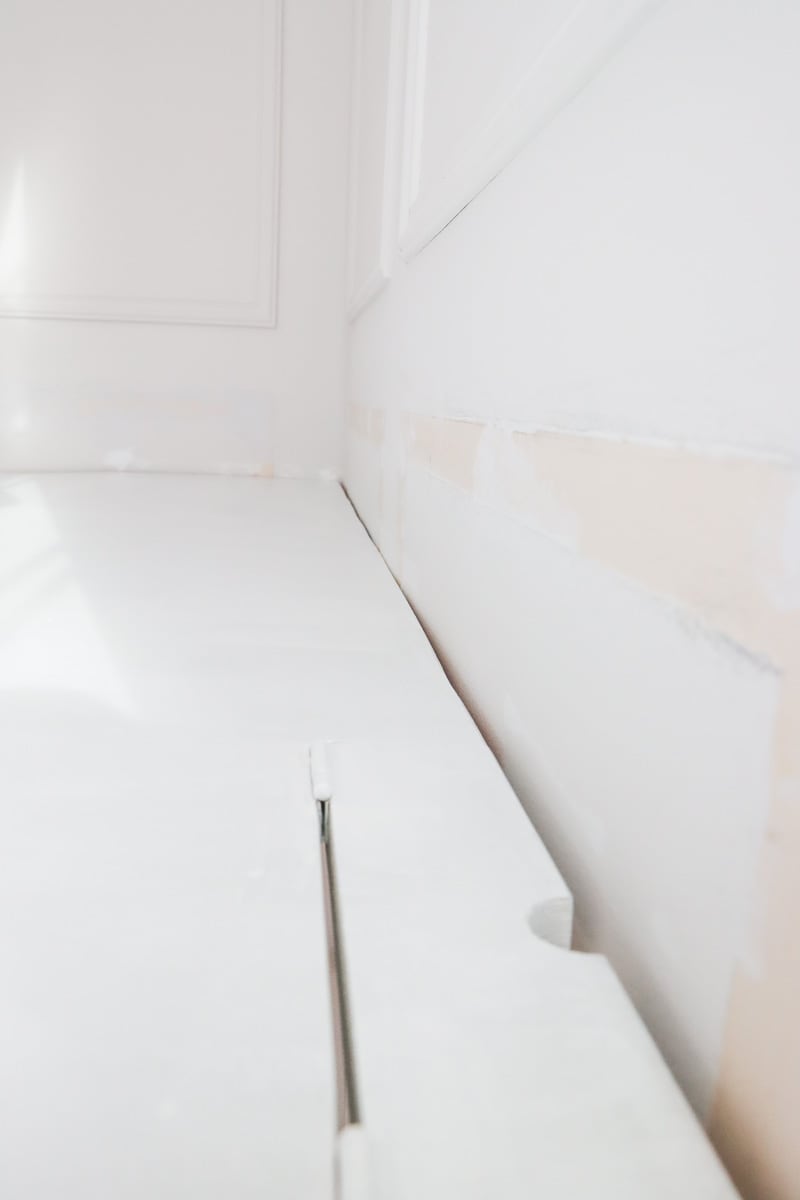
Then I applied some speckle and caulk to conceal all the gaps and nail holes. I did some touch up paint so everything flows together.
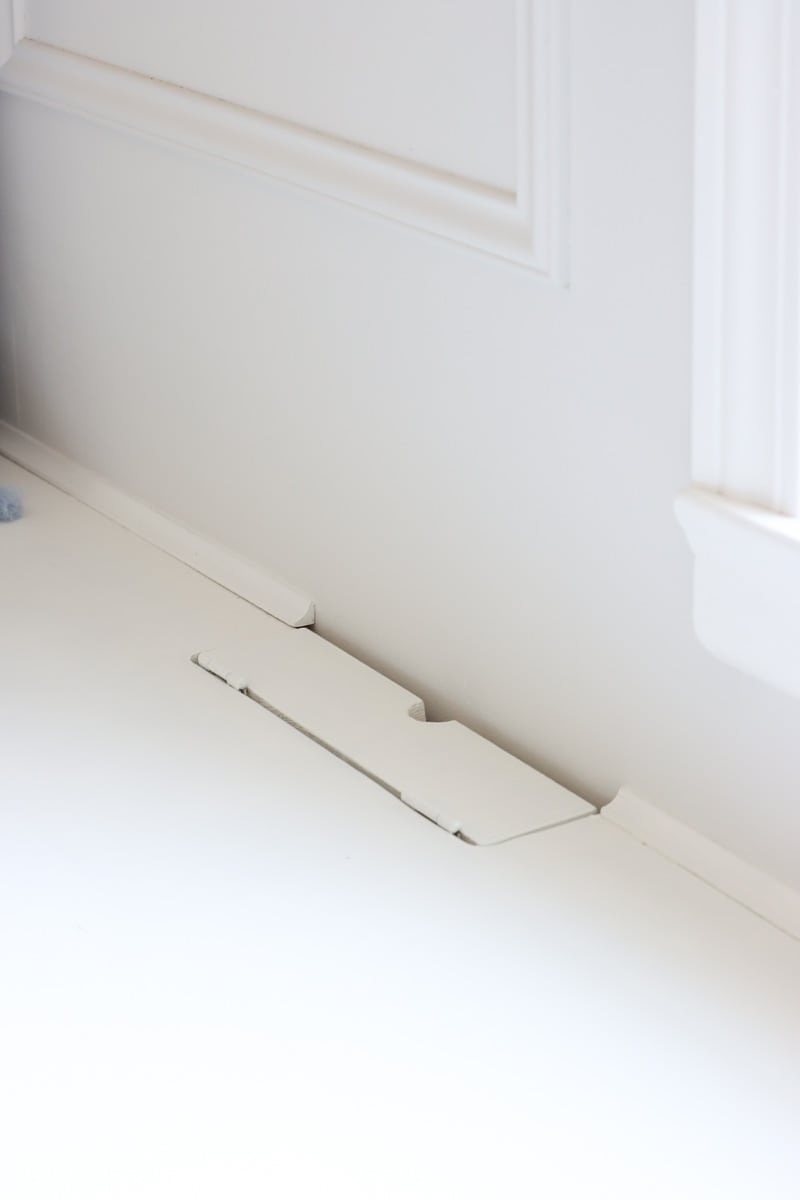
Step 7. Add hidden outlet socket to bench top
I found this outlet cover with power strip works very well for the window seat: it doesn’t take much depth, which is perfect for my case as I only left a 5/8” gap between Nordli and the wall.
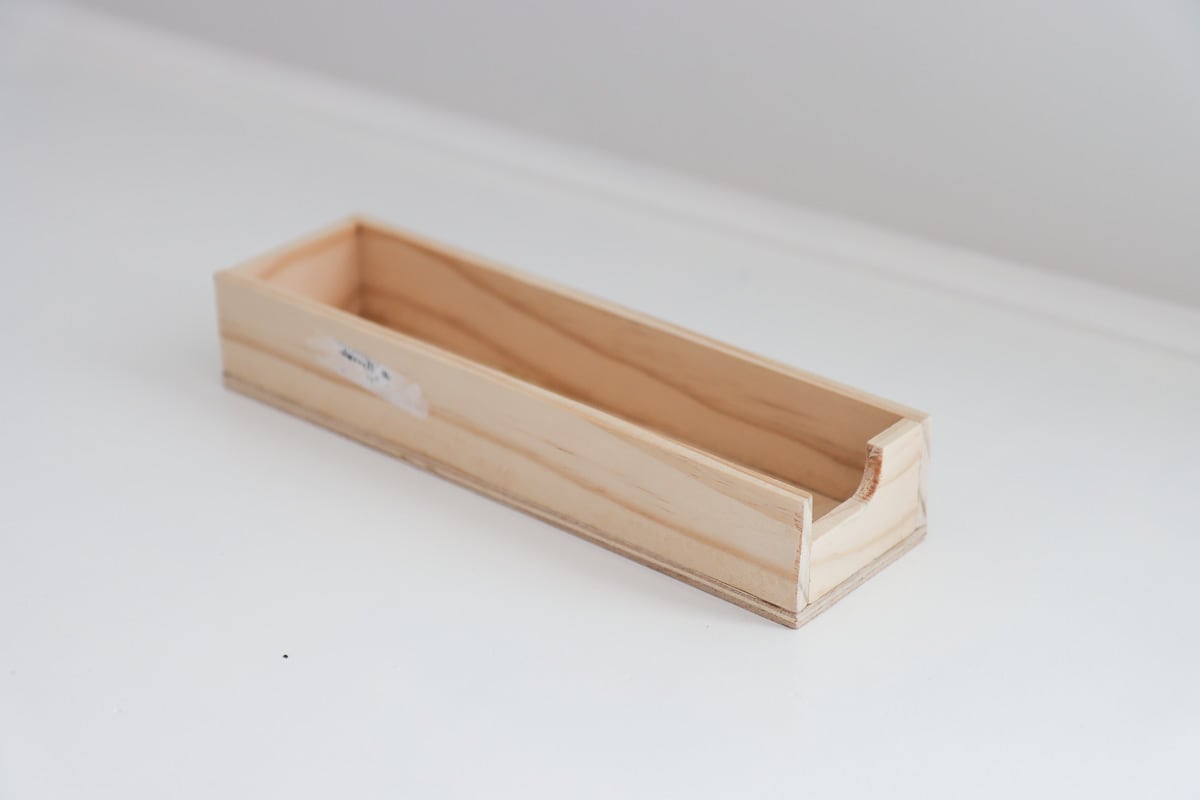
I cut several pieces of 1/4″ wood and glued them together using wood glue. I clamped them overnight for the glue to cure. I also created a notch on the left side of this box so that the outlet cable can pass through.
To add the box in, I slid it from the top and placed it on top of the notch of the Nordli back frame at the notch was created in the previous step. This outlet extension comes with some double sided tape. So I just use them to hold everything in place.
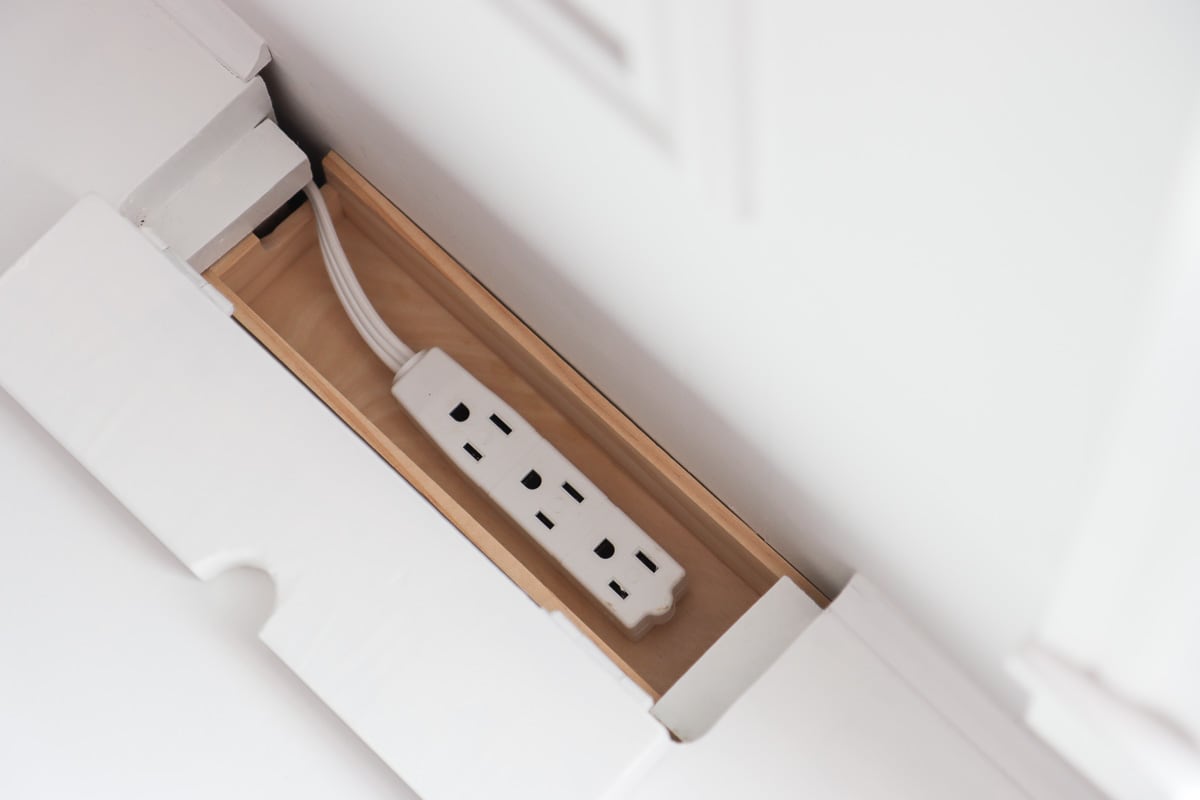
Having this hidden power outlet on the bench not only lets me still have access to the wall outlet that is covered by my window seat, but it also makes it convenient to charge my phone or plug in small appliances.
Step 8. Add Nordli drawers to DIY window seat
To slide in the drawers, I basically followed the Ikea instructions. First pull the tracks out, then place the Nordli drawer in position and slide it in. Once it sits at a proper position, I push the white switch and to the engaged position.
You can check out my Youtube video to see how I added the drawers.
What’s nice about the Nordli unit is that their drawers have soft closure which just feels so nice to use. Also bench seat with drawers is such a great storage solution!
Download the DIY build plan
Take the hassle out of your DIY window seat project with the comprehensive build plans for $4.99.
📖 What’s Included:
- Efficient Format: All instructions neatly organized in a PDF book format.
- Ad-Free: No interruptions, just a focused building experience.
- Portability: Print it or keep it on your device for on-the-go reference.
- In-Depth Guidance: Cut list, precise measurements, detailed instructions, 3D diagrams, and valuable tips.
Ikea Nordli bench seat hack summary
Those are all the steps to make your own DIY window seat with Ikea Nordli hack! It was such a fun and rewarding project, although it does take some time and patience!
I just love how hacking Nordli dressers makes it possible to fulfill my needs and make my space more functional with tons of storage. I hope you find this post and video useful if you are looking to build something similar or looking for ideas to hack Ikea Nordli units!
And let me know if you have any questions in the comment section.
More Ikea hack ideas
DIY Dining Banquette Seating with Ikea Havsta Hack
Ikea Alex Desk Hack Home Office Built-ins
Home Office Closet Built-ins with Ikea Trofast Storage
Pin it for later
I absolutely love the Nordli hack for creating a window seat! The design is not only practical but also adds a cozy vibe to the space. I can’t wait to try this DIY project in my own home. Thank you for sharing such detailed instructions and beautiful photos!
I absolutely love this DIY IKEA window seat! The Nordli hack is such a creative way to utilize space while adding a cozy touch to the room. The paint color you chose complements the hydrangeas beautifully! Can’t wait to try this at home. Thank you for sharing such an inspiring project!
This DIY IKEA window seat looks amazing! I love how you’ve transformed the Nordli into such a cozy and functional piece. The instructions are clear and easy to follow—can’t wait to try this in my own home! Thanks for the inspiration!
This DIY window seat is absolutely brilliant! I love how you transformed the Nordli units into such a cozy and stylish spot. The hydrangea decor adds a beautiful touch too! Can’t wait to try this in my own home. Thank you for the inspiration!
I absolutely love this DIY IKEA window seat hack! The Nordli pieces fit perfectly into my space, and the design is so beautiful. The addition of cushions and decor truly transforms the area. Can’t wait to try this out in my own home—thanks for the inspiration!
What a fantastic transformation! I love how you incorporated the Nordli pieces into the window seat design. The color scheme is so refreshing, and it really brightens up the space. Can’t wait to try this hack for my own home—thanks for the inspiration!
I absolutely love this DIY Nordli hack! The window seat looks cozy and functional, plus the hydrangea touches are a beautiful addition. Can’t wait to try this in my own home! Thanks for sharing such a creative idea!